 Day One Fixes
SolvedHow-toUpdated
Digimon Story Time Stranger: (Updated) the True Formula for Stat Grinding: A Deep Dive Into The…
Short answer
TL;DR: The Secret to Maxing Stats The permanent stat bonus from Digivolving is 10% of the raw stats gained from leveling in the previous form. "Raw stats gained" is the difference between stats at Lvl X and Lvl 1 (after removing temporary boosts). To maximize the bonus, level up as much as…
Steam Community guide by SilverScorch.
Intro
Hello everyone,
After extensive testing, I've managed to reverse-engineer the hidden mechanic that governs how bonus stats (the blue numbers in parentheses) are calculated when you Digivolve and De-Digivolve. The numbers are confusing amongst the online community, but we have discovered the true formula.
The Core Mechanic: The 10% Bonus Rule
The system is simpler and more universal than previously thought. The bonus added to your blue stats during any form change is 10% of the stats gained from leveling up the previous form.
This applies to both Digivolving and De-Digivolving.
For this guide, we will refer to the stats gained from leveling as the "Stat Gap". This is calculated as: White Stat - Blue Stat.
The formula is:
Bonus Gained = 10% of ("Stat Gap" Growth)
Decimals are not shown, but are still calculated.
Key Findings and Debunked Myths
Attachments:
Attachment that boost stats like ATK Attatchment I directly increase the numbers of your blue stats.
The Role of Talent and Bond
Talent: This stat's primary function is to determine your Digimon's maximum level cap. It does not affect the 10% bonus formula itself.
Bond (%): The Quota System: Bond acts as a consumable resource for stat inheritance.
It's an "on/off" switch: A Digimon with 0% Bond receives no blue stat bonus upon digivolution.
It's a quota: Every time you Digivolve or De-Digivolve, 1 quota point of Bond is consumed. This happens even if you haven't leveled up. This means a Digimon with 100 Bond can only inherit stats 99 times.
Fodder (Enhancements)
Using "fodder" to enhance a Digimon is a powerful way to boost stats directly.
Blue Stat Transfer: Fodder transfers 50% of its own blue stats to the target, including 50% of the stats gained through leveling up that would have became blue stats after digivolving. Using many 200% scanned In-Training Digimon is a great way to max out HP early, as scans over 100% grant bonus HP and Talent.
Talent Gain: You gain 1-5 Talent based on the fodder's Talent. Even feeding a 100 Talent Digimon will only grant a maximum of 5 Talent.
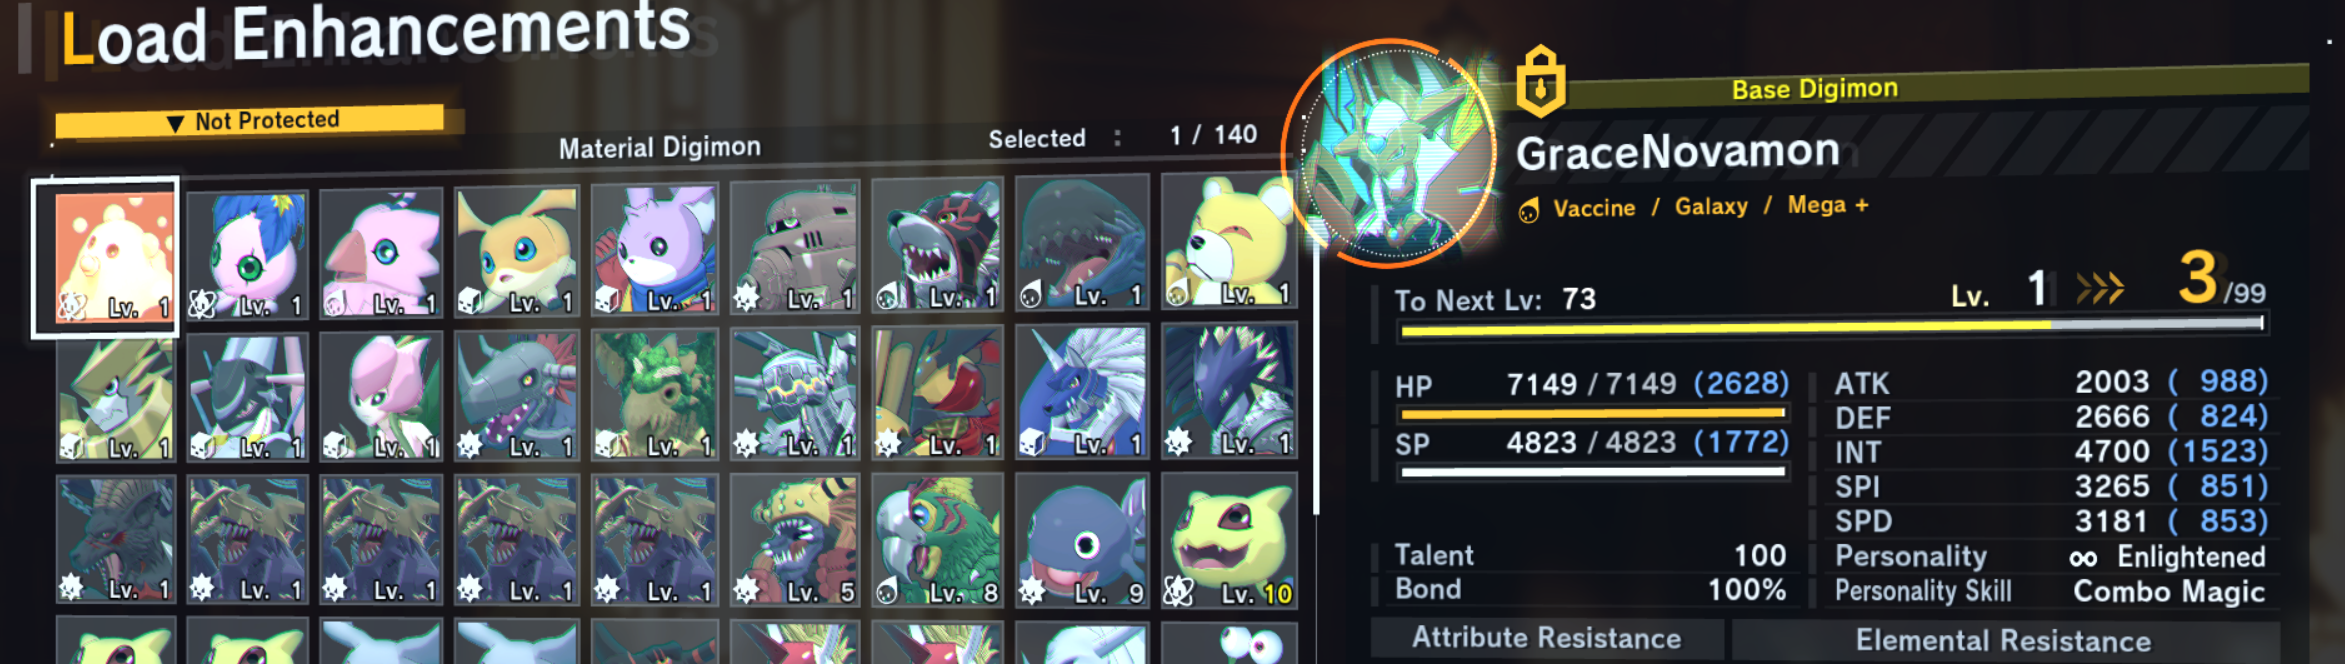
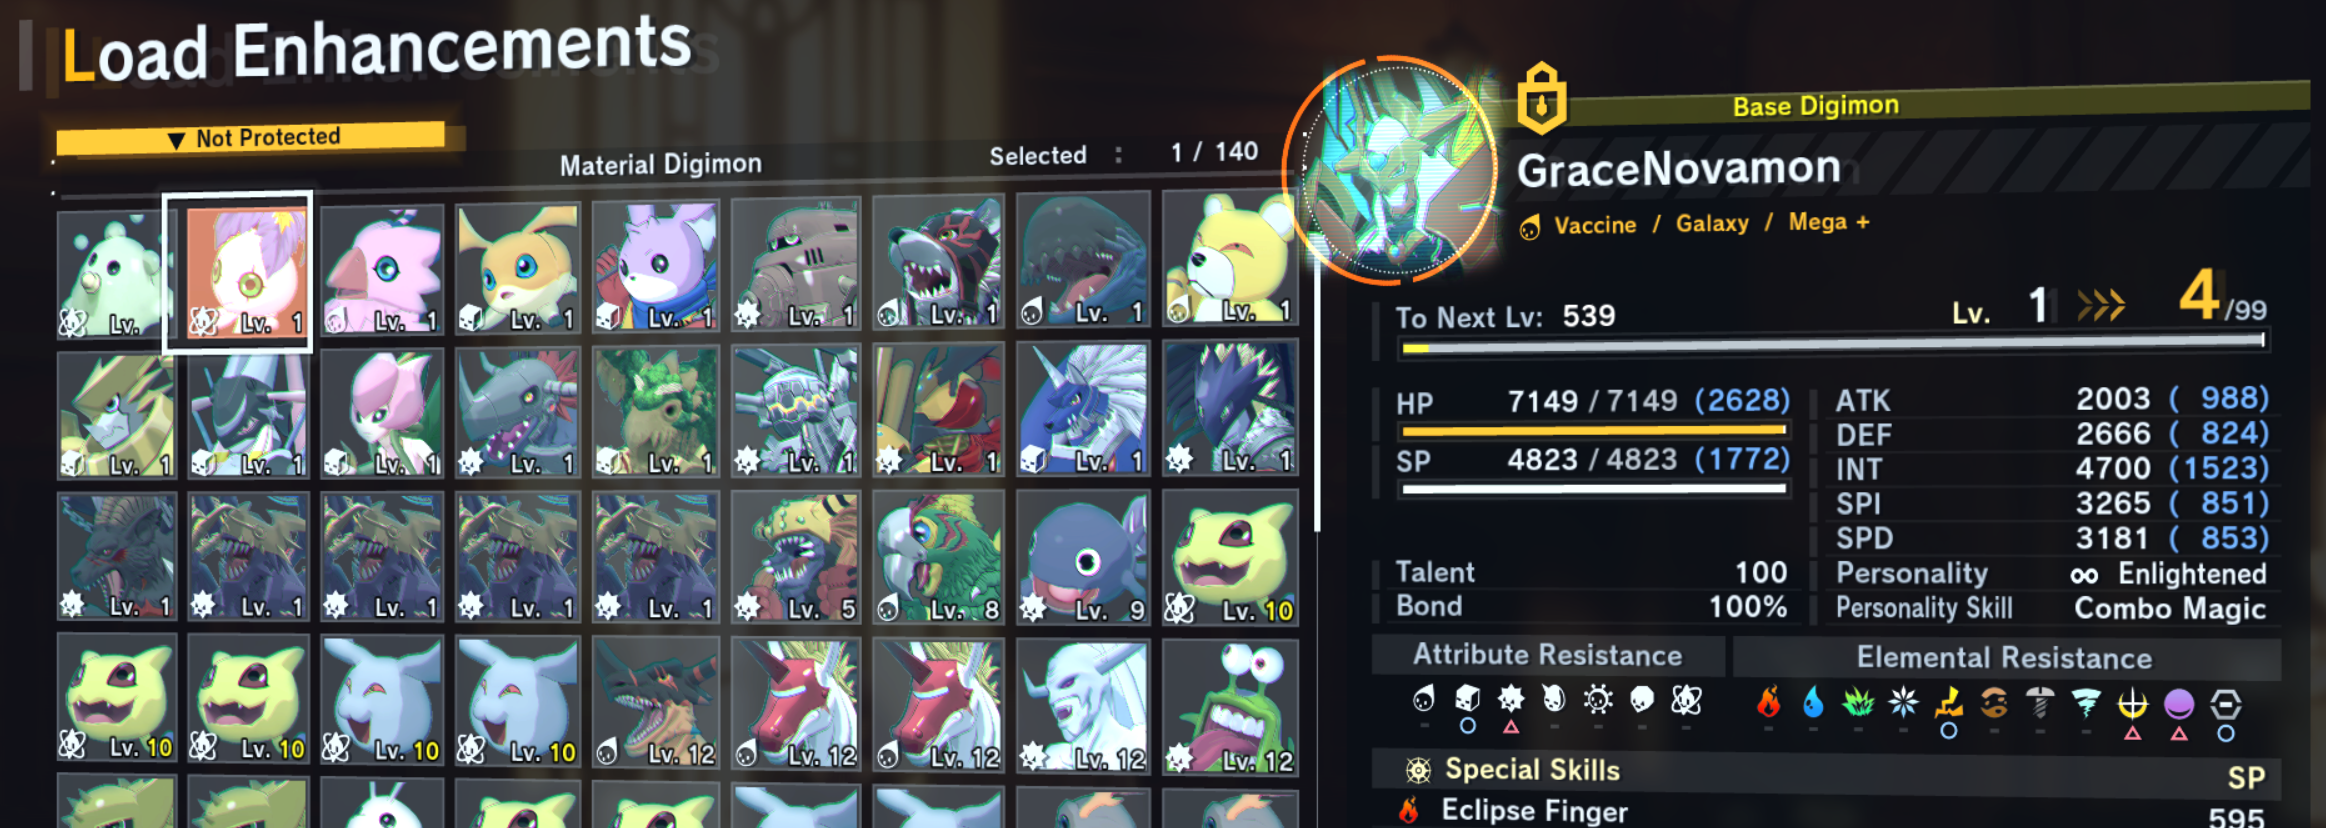
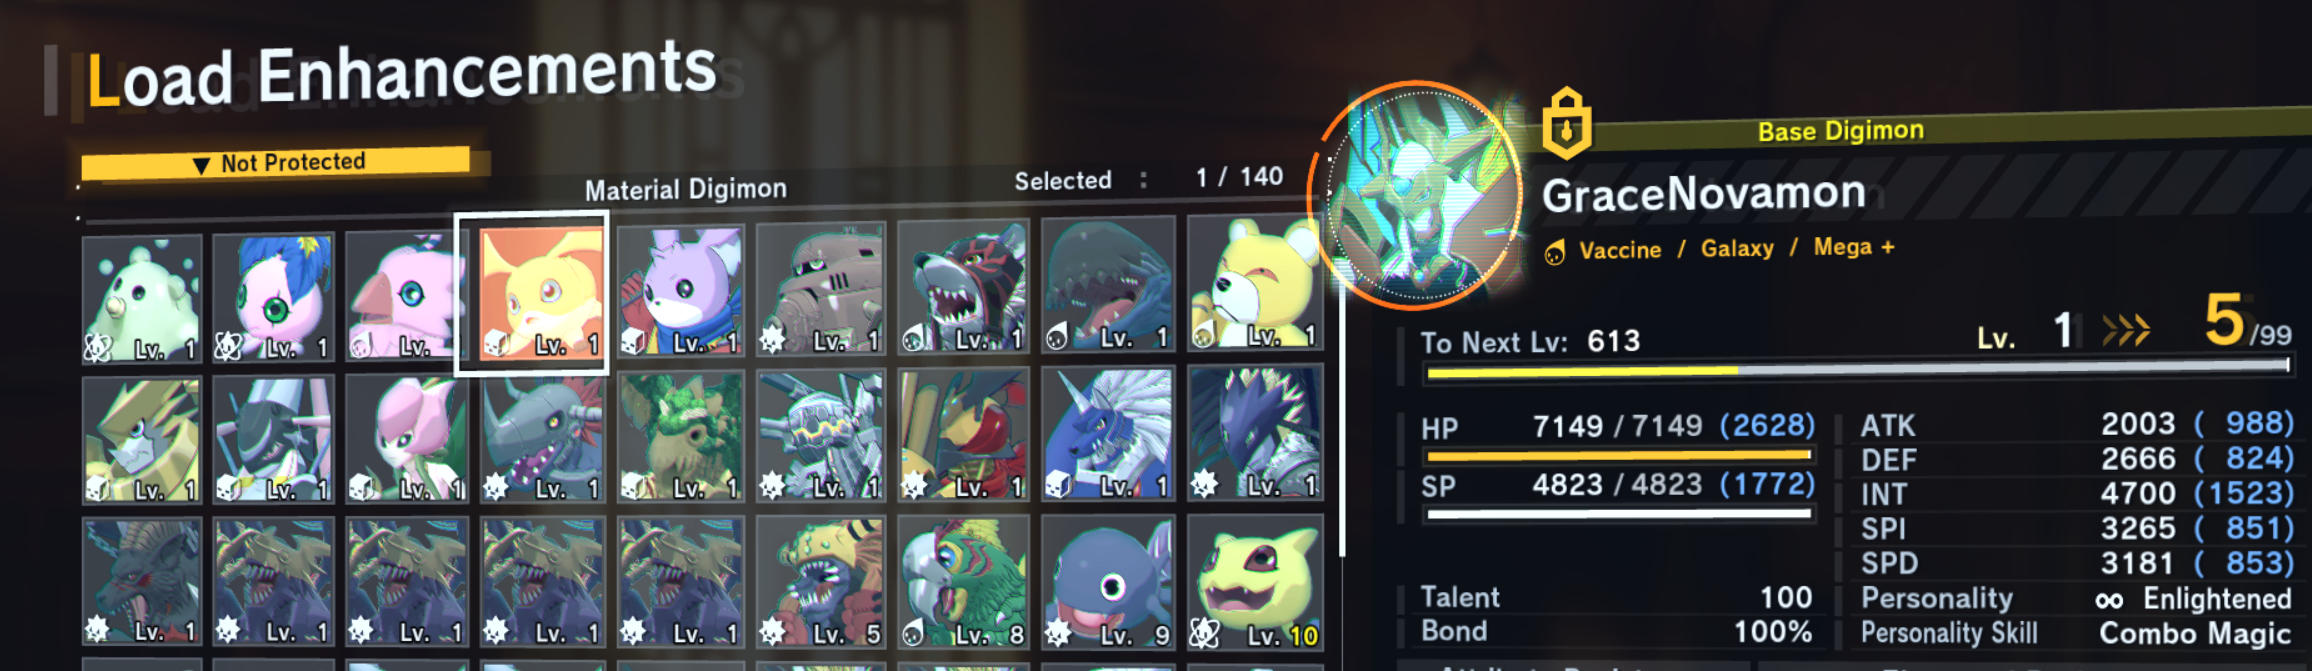
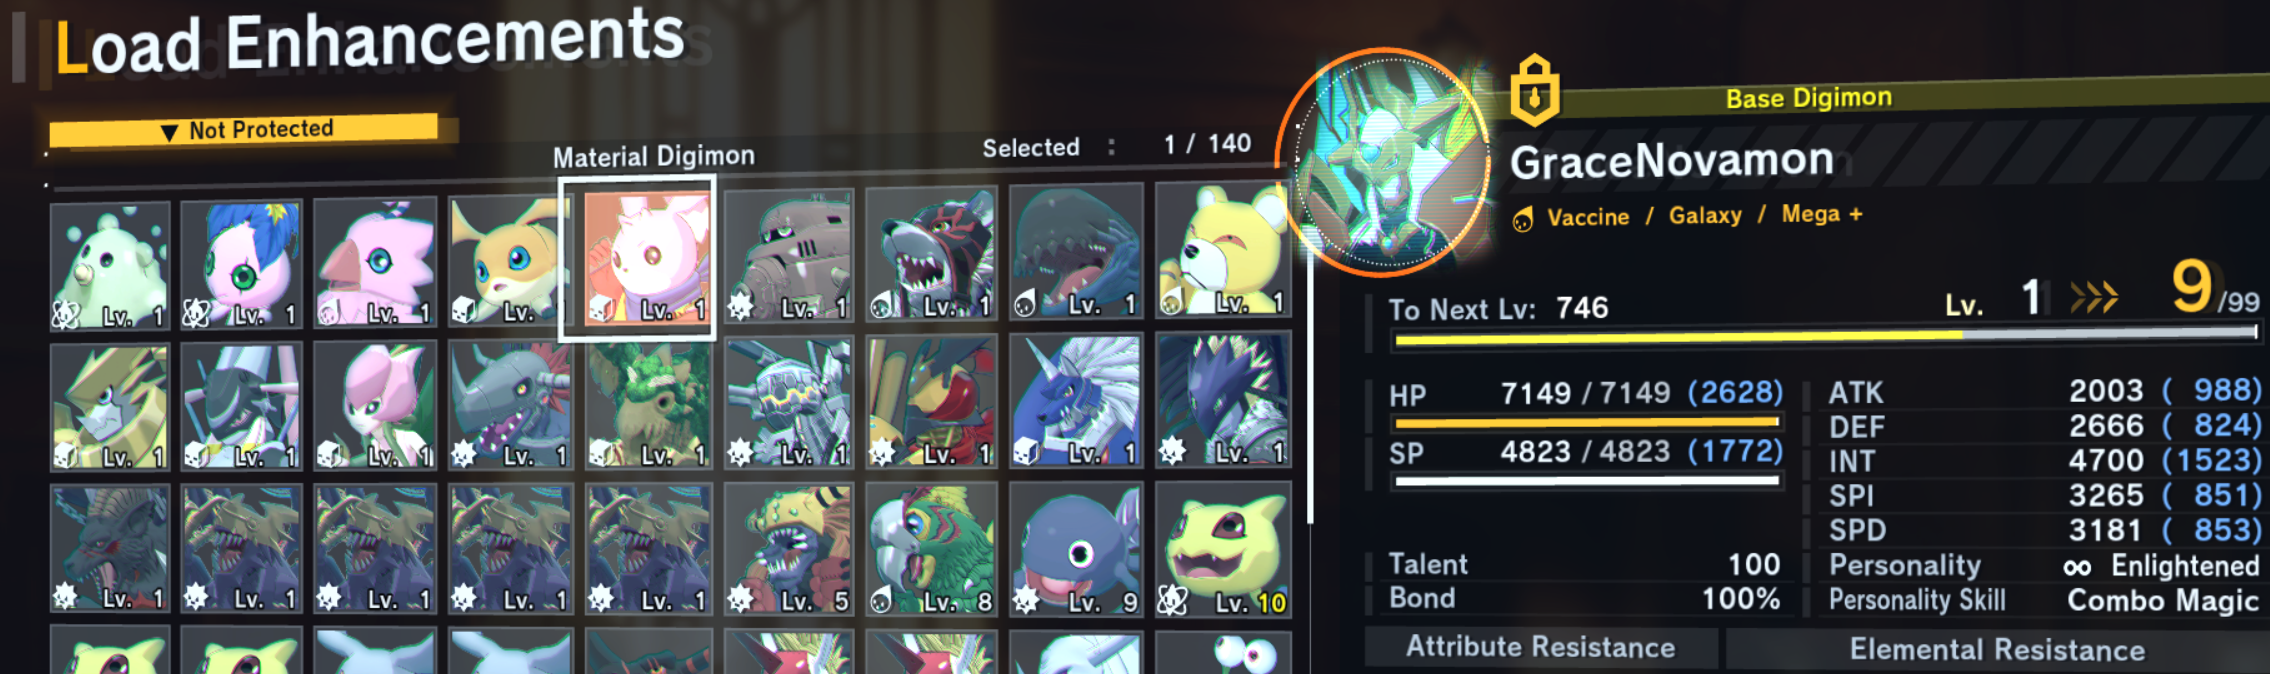
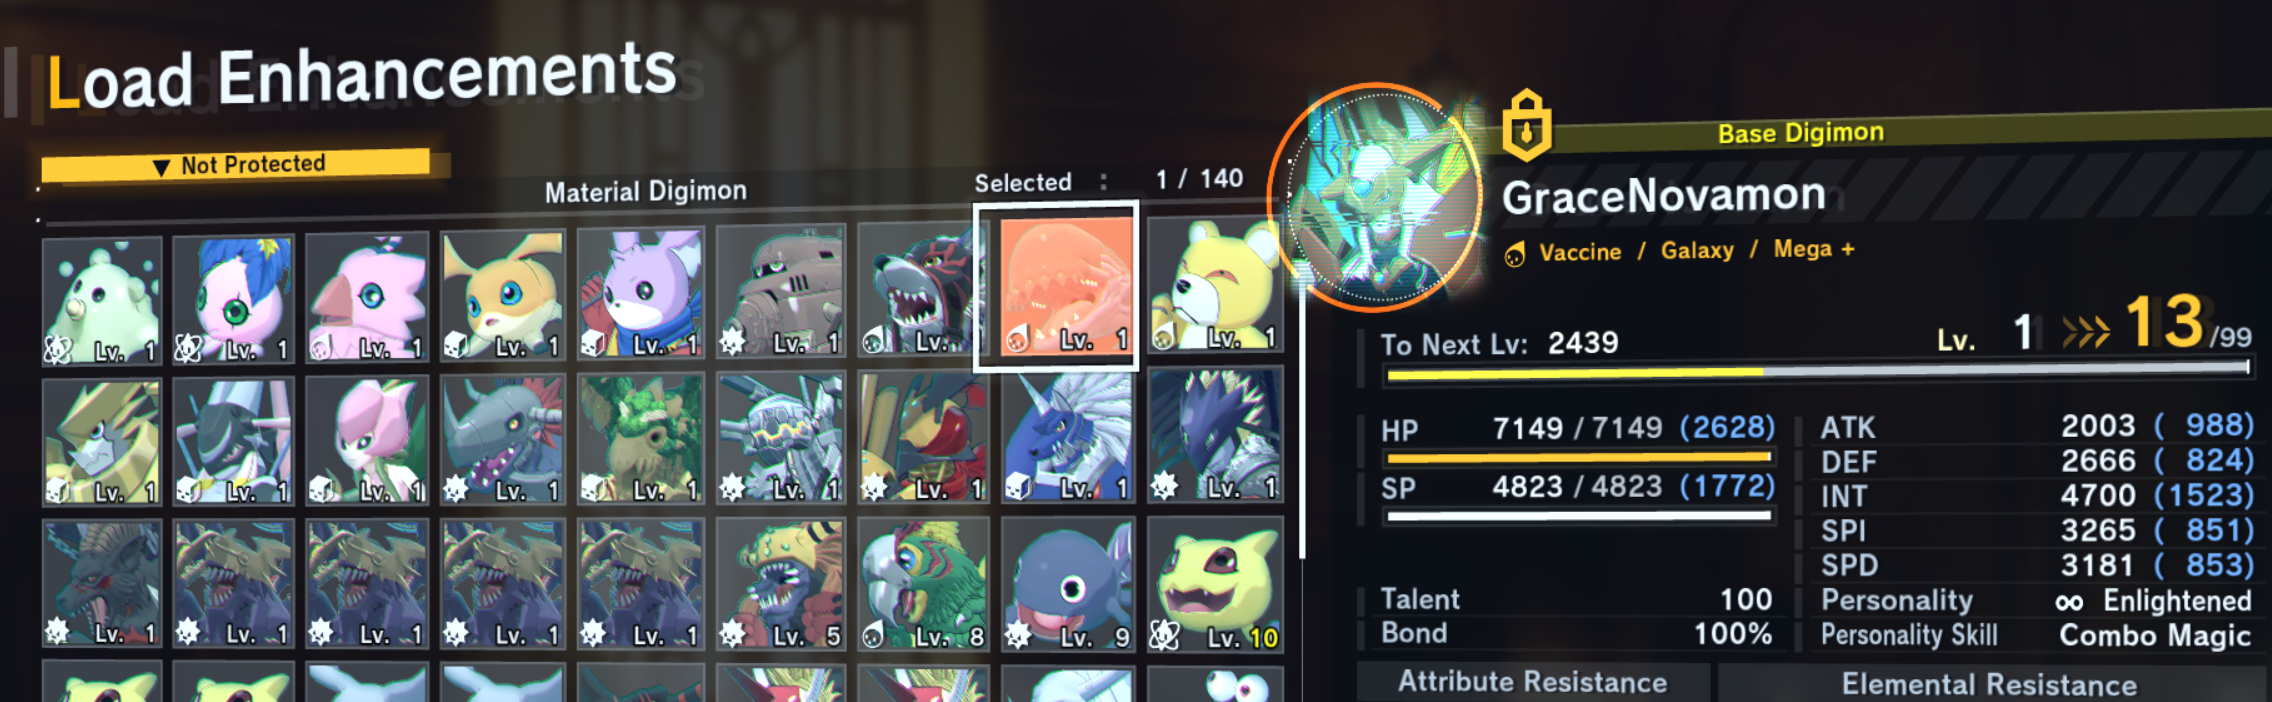
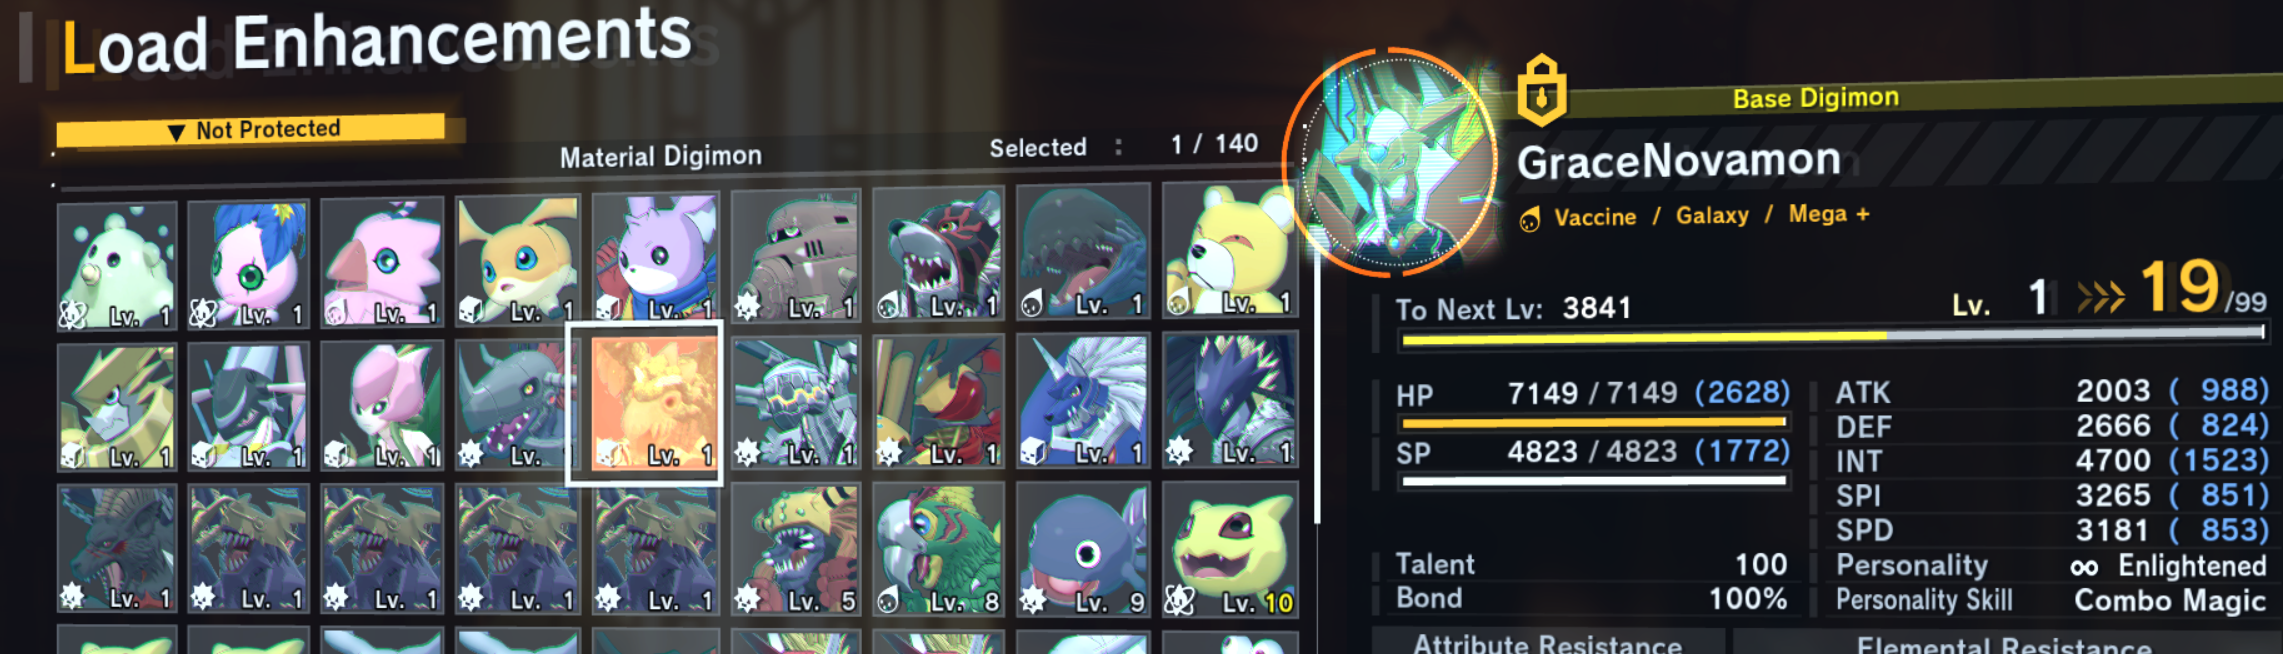
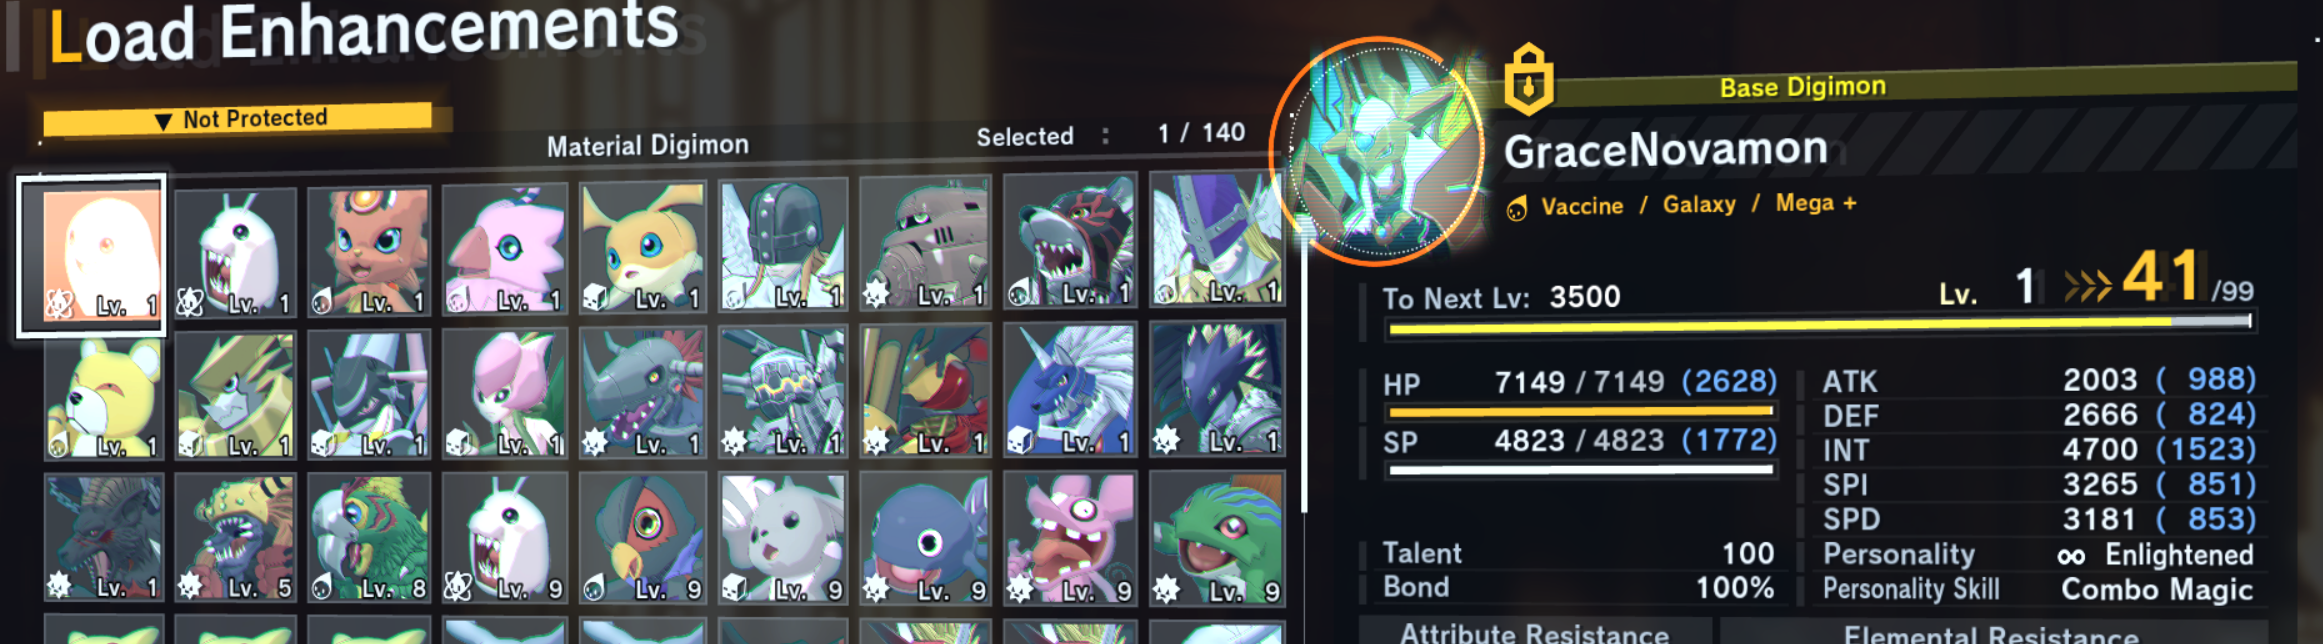
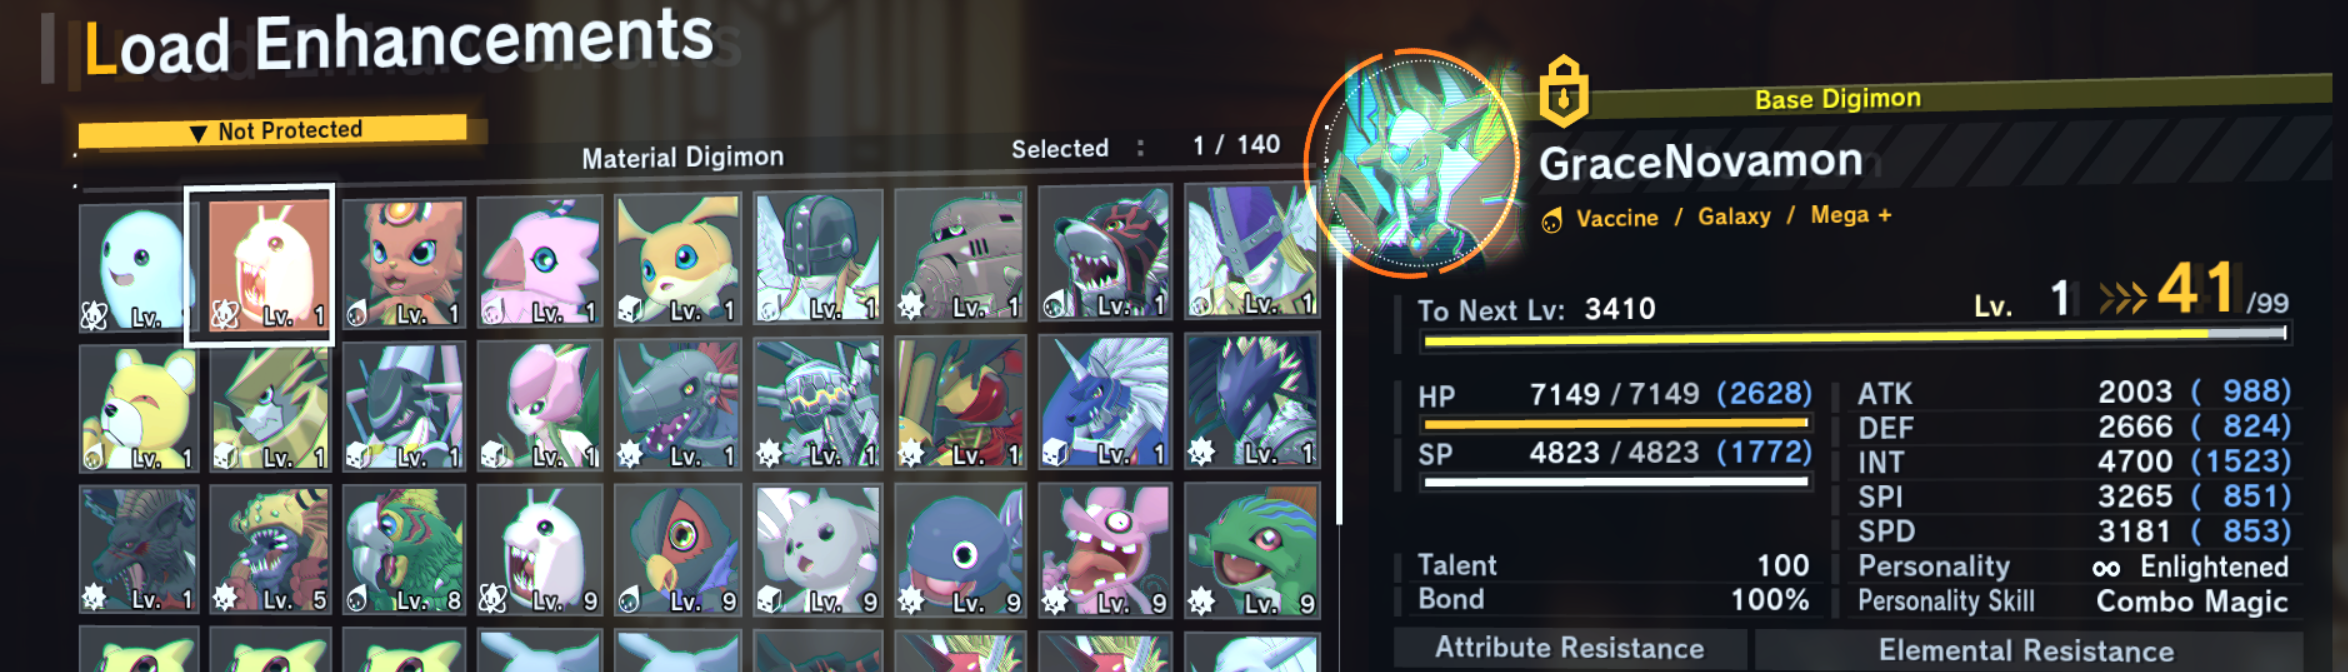
EXP Gain: The EXP gained from fodder is determined by:
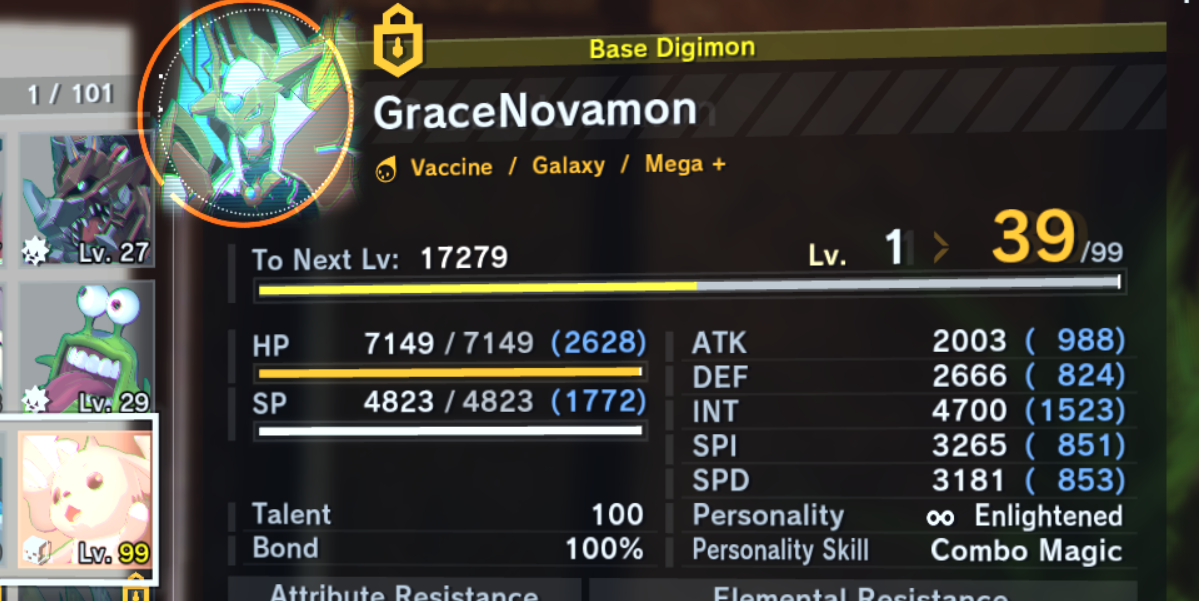
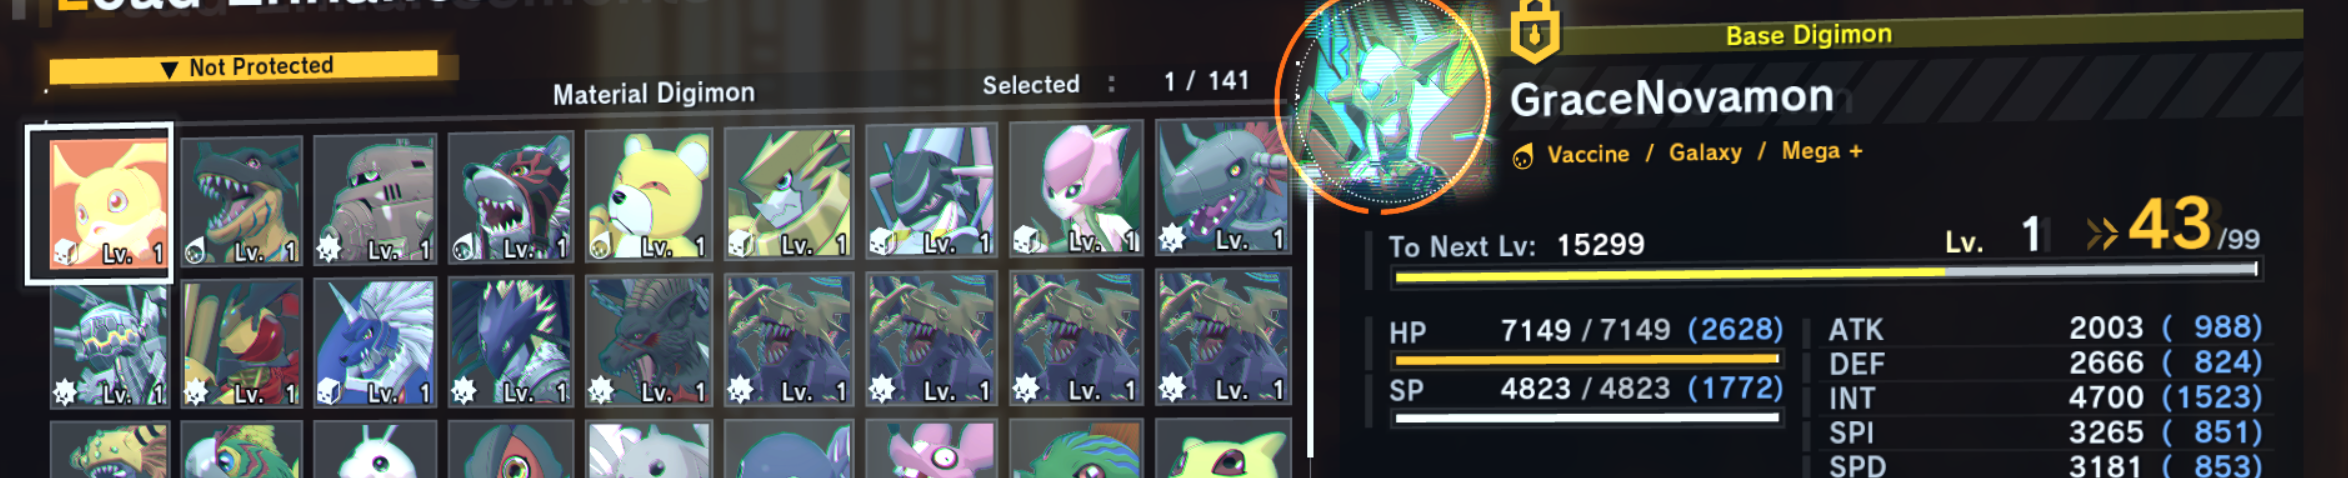
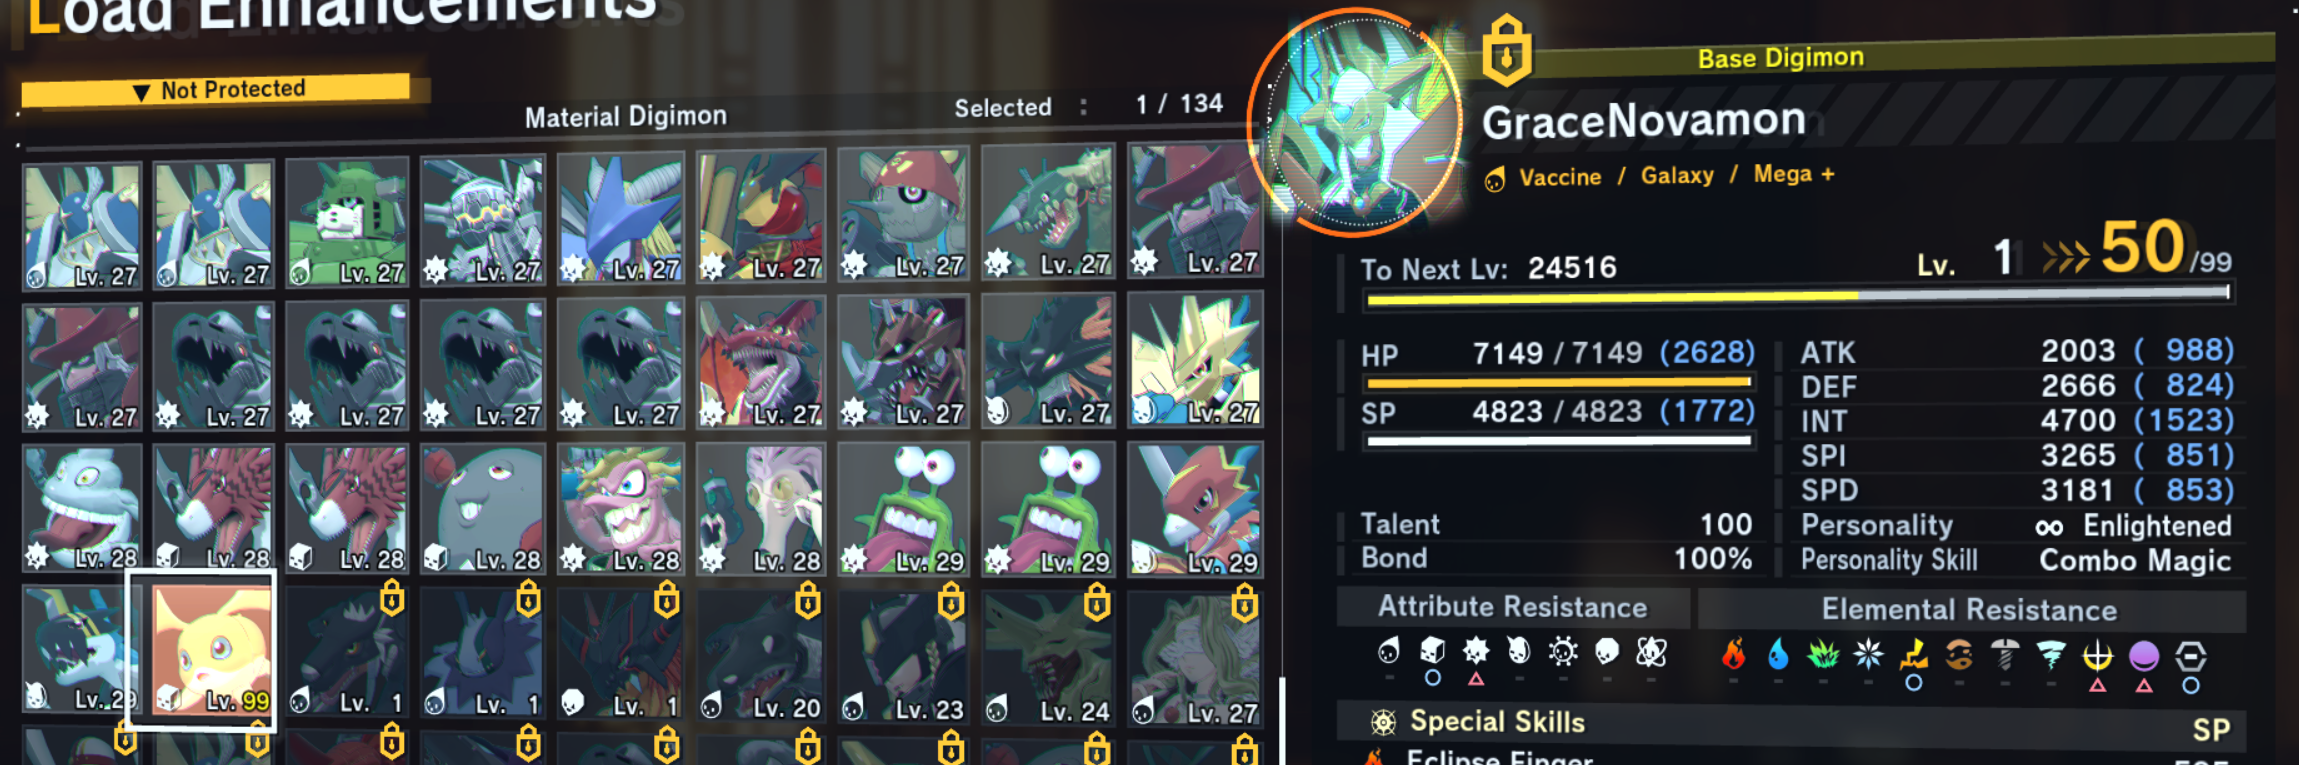
Bond (High Impact): Higher Bond gives much more EXP. A max level, max Bond fodder can take a Digimon from level 1 to 50. A max level, zero Bond fodder only gets it to level 39.
Digivolution Stage (Medium Impact): Higher stages give more EXP.
Level (Low Impact): Higher level gives slightly more EXP.
Stat Gain and EXP Scaling
Consistent Stat Gains: The amount of stats you gain per level is roughly the same from In-Training I all the way to Mega+. You don't lose potential by leveling up a lower-stage Digimon.
EXP Curve: The EXP required per level is also consistent across stages, but it scales immensely as you approach Level 99. This creates a trade-off: leveling to max gives the biggest bonus per evolution, but costs a huge amount of time for a single Bond Quota point.
Farm Training & Agent Skills
Farm Training: Stats gained from farm training are temporary white stats. They help meet evolution requirements but will not be carried over as blue stats when you Digivolve. The farm also does not provide passive EXP; Digimon there gain EXP the same as those in the box.
Agent Skills: Skills like "Bonds of Loyalty: Body Boost" are temporary boosts reflected in the white stats, not the permanent blue stats.
Personality Skills
Certain personalities have powerful secondary effects. For example, an Overprotective healer allows healing spells to restore HP beyond the 9999 cap (double the target digimon's max HP) and significantly increases the proc rate of HP-based passive skills like Combo Magic.
Putting It All Together: The Grind
Maximizing blue stats to 9999 is an enormous undertaking. It requires balancing leveling time with efficient use of your Bond Quota. For the ultimate grind, we dived into methods for resource management.
Advanced Grinding: The Cloning Technique
This technique uses reverse DNA Digivolution to create a copy of your Digimon, preserving its high Talent and Bond. This allows you to create powerful EXP fodder or pursue multiple evolution paths without consuming your main Digimon's Bond Quota.
The Method: Requires a Mega stage Digimon that is the result of a DNA Digivolution. By De-Digivolving it, you can split it back into its two Ultimate-level components. This creates a "clone".
The Catch: Clones are literal copies. They share the same Bond consumption quota as the main body from the moment of cloning. Additionally, the original Digimon's blue stats are split between the two resulting clones.
Best Cloning Recipes
Here are three of the most effective cloning loops we have discovered.
Grankuwagamon (zealous) -> dinobeemon (tolerant)-> stingmon (tolerant) or exveemon(zealous).
You maintain the original personality of the selected digimon, and the other half will follow the default. Example, you select Stingmon. If your Dinobeemon was zealous, the stingmon would be zealous. The cloned Ex Veemon would be zealous as default; If you select Exveemon, the cloned stingmon would be tolerant, following its default personality.
From there, you have 2 paths to go back to Grankuwagamon to repeat the loop.
- stingmon (tolerant) -> okuwamon (zealous) -> grankuwagamon (zealous)
- exveemon (zealous) -> veemon -> tsunomon -> elecmon -> kuwagamon (zealous) -> okuwamon (zealous) -> grankuwagamon (zealous)
Goldramon (enlightened) -> shakkoumon (overprotective) -> angemon (enlightened) or ankylomon (overprotective) clone - angemon (enlightened) -> magnaAngemon (enlightened) -> goldramon (enlightened)
- ankylomon (overprotective) -> armadillomon -> tokomon -> patamon (enlightened) -> angemon (enlightened) -> magnaAngemon (enlightened) -> goldramon (enlightened)
Valkyrimon (tolerant) -> silphymon (tolerant) -> aquilamon (sociable) or gatomon (tolerant) clone - aquilamon (sociable) -> biyomon -> unimon (strategic) -> reppamon (strategic) -> chirinmon (strategic) -> valkyrimon (tolerant)
- gatomon (tolerant) -> salamon -> nyaromon -> kudamon (strategic) -> reppamon (strategic) -> chirinmon (strategic) -> valkyrimon (tolerant)
Siplymon one is the hardest cause the digivolutions above it all have different base personality from aquilamon and gatomon, so have to find a strategic digimon as the base to clone for sociable/tolerant
so with these 3 dna digivolution targets you can get 100 bond, 100 talent zealous / tolerant / enlightened / overprotective / sociable. 5 personalities.
What to Do With Clones
EXP Packs: Level a high-Talent, max-Bond clone to Level 99 and use it as premium fodder.
Unlock Paths: Use clones to unlock different Digivolutions in the Field Guide without spending your main team's Bond Quota.
Farm Sitters: Digivolve a clone into its final form and let it gain stats in the farm until it's maxed out.
Cash: Return a Mega+ clone to data for a quick 30,000 Yen.
Tests done, a step-by-step research
The Correct Formula 🧪
First, we need to establish how the game calculates the final displayed stats and then reverse it.
Game's Calculation: Displayed Stat = (True Stat + Flat Bonus) × Multiplier
Our Reverse Formula: True Stat = (Displayed Stat ÷ Multiplier) - Flat Bonus
Based on my agent skills and analysis, here are the bonuses:
Multipliers (from agent skills for "devoted digimon stats"):
HP: 1.20 (20%)
SP, INT, ATK & SPD: 1.45 (45%)
DEF & SPI: 1.75 (75%)
Flat Bonuses (from "agent skills boosts"):
Rookie: +150 to HP/SP, +20 to others.
Champion: +100 to HP/SP, +15 to others.
Now, let's apply this to the digivolution cycle.
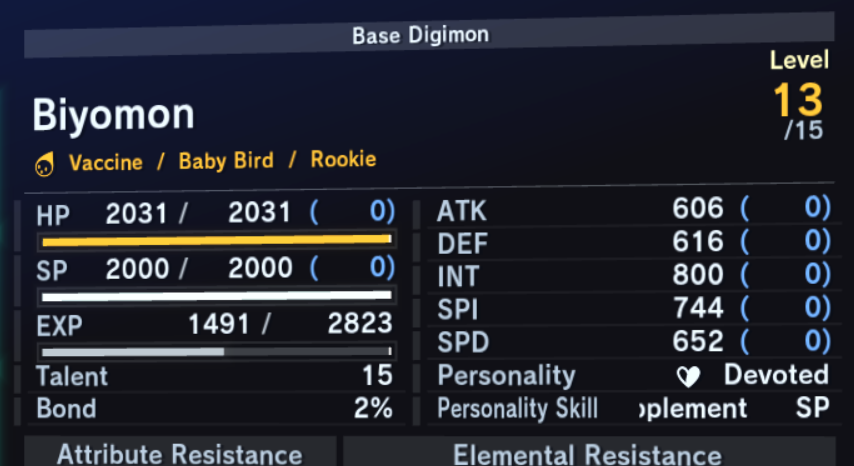
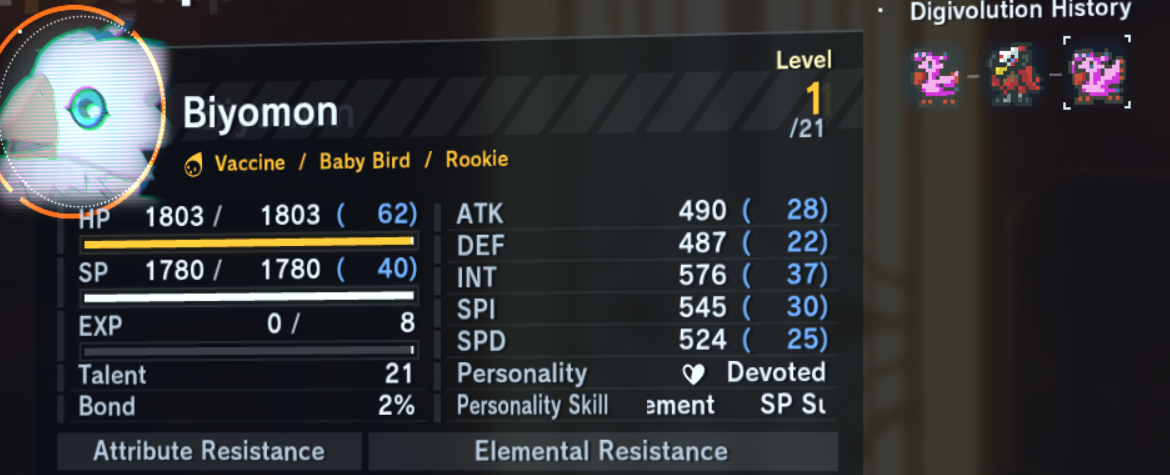
Step 1: Raw Gain from Biyomon (Lvl 1 → 13)
First, we de-inflate the stats from the start and end of the first leveling cycle using the Rookie flat bonuses and the multipliers.
De-inflated Lvl 13 Stats:
True HP: (2031÷1.20)−150=1543
True SP: (2000÷1.45)−150=1229
True INT: (800÷1.45)−20=532
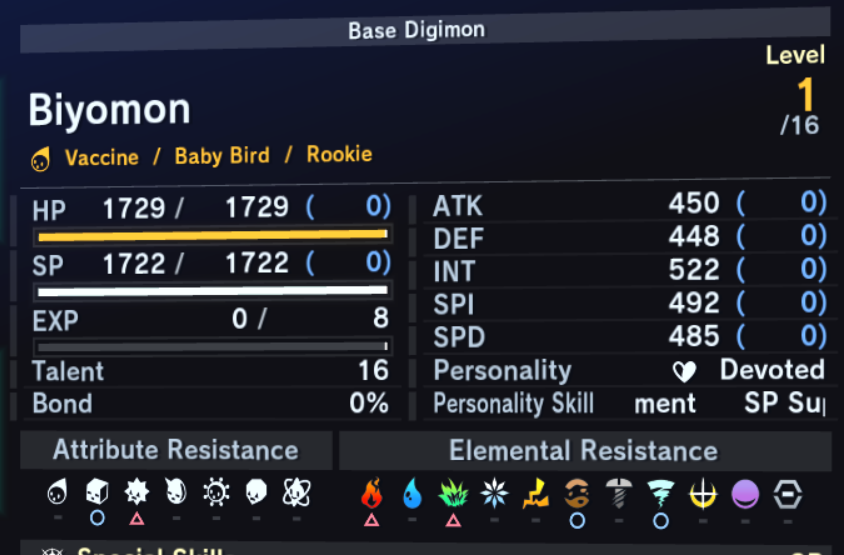
De-inflated Lvl 1 Stats (Fresh):
True HP: (1729÷1.20)−150=1291
True SP: (1722÷1.45)−150=1038
True INT: (522÷1.45)−20=340
Subtracting the Lvl 1 stats from the Lvl 13 stats gives us the raw gain.
Raw HP Gain: 1543−1291=252
Raw SP Gain: 1229−1038=191
Raw INT Gain: 532−340=192
Step 2: Inherited Stats for Aquilamon (Lvl 1)
When Biyomon digivolves, Aquilamon inherits 10% of those raw gains as its first blue stats. The "Devoted" personality increases the base growth, which is already reflected in the raw gain numbers we just calculated.
Predicted Blue HP: 252×0.10=25.2 (Actual is 25. Perfect match.)
Predicted Blue SP: 191×0.10=19.1 (Actual is 19. Perfect match.)
Predicted Blue INT: 192×0.10=19.2 (Actual is 19. Perfect match.)
This confirms our formula and multipliers are correct.
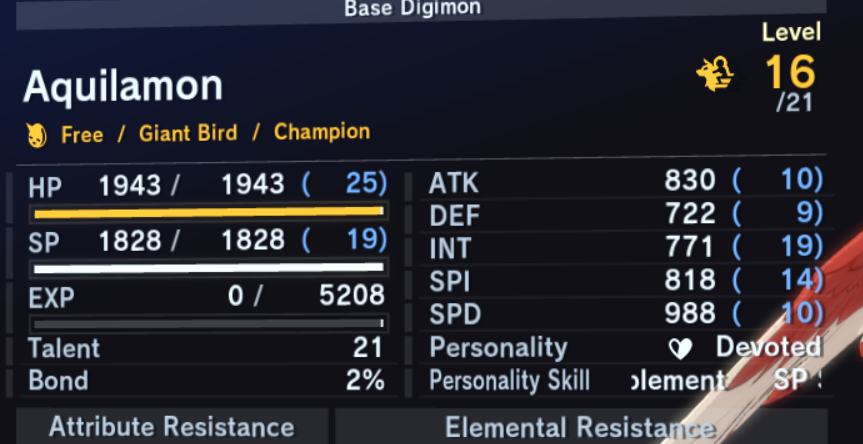
Step 3: Raw Gain from Aquilamon (Lvl 1 → 16)
Now we do the same for the second cycle, using the Champion flat bonuses.
De-inflated Lvl 16 Stats:
True HP: (1943÷1.20)−100=1519
True SP: (1828÷1.45)−100=1161
True ATK: (830÷1.45)−15=557
And so on for all stats...
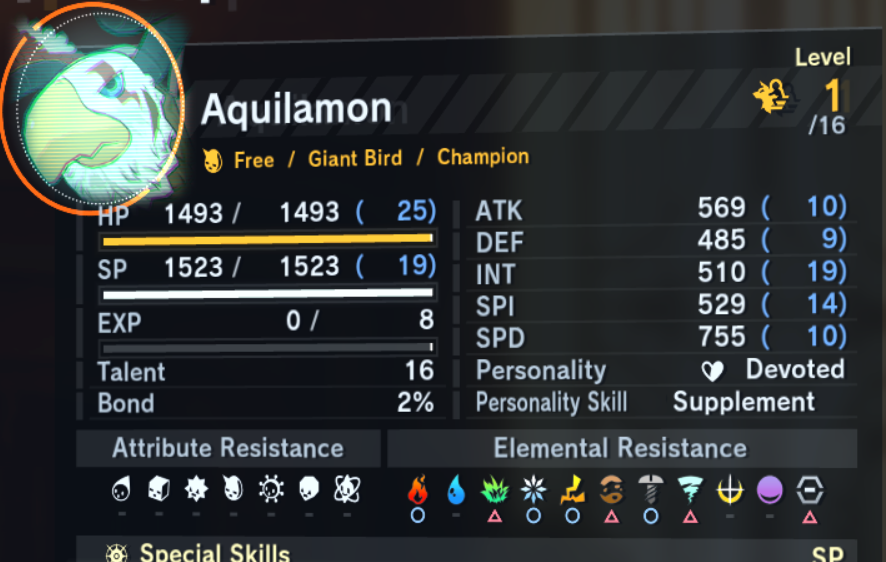
De-inflated Lvl 1 Stats (with blue stats):
True HP: (1493÷1.20)−100=1144
True SP: (1523÷1.45)−100=950
True ATK: (569÷1.45)−15=377
And so on for all stats...
This gives us the raw gain for the second cycle:
Raw HP Gain: 1519−1144=375
Raw SP Gain: 1161−950=211
Raw ATK Gain: 557−377=180
...and so on.
Step 4: Final Compounded Blue Stats
Finally, we add 10% of the new raw gains to the old blue stats from Aquilamon to predict the final Biyomon's stats.
Final Blue HP: 25(old)+(375×0.10)=25+37.5=62.5 (Actual is 62. Perfect.)
Final Blue SP: 19(old)+(211×0.10)=19+21.1=40.1 (Actual is 40. Perfect.)
Final Blue ATK: 10(old)+(180×0.10)=10+18=28 (Actual is 28. Perfect.)
Final Blue DEF: 9(old)+(135×0.10)=9+13.5=22.5 (Actual is 22. Perfect.)
Final Blue INT: 19(old)+(180×0.10)=19+18=37 (Actual is 37. Perfect.)
Final Blue SPI: 14(old)+(165×0.10)=14+16.5=30.5 (Actual is 30. Perfect.)
Final Blue SPD: 10(old)+(161×0.10)=10+16.1=26.1 (Actual is 25. Very close, likely due to rounding during the process.)
As you can see, this method correctly predicts the final stats with near-perfect accuracy.
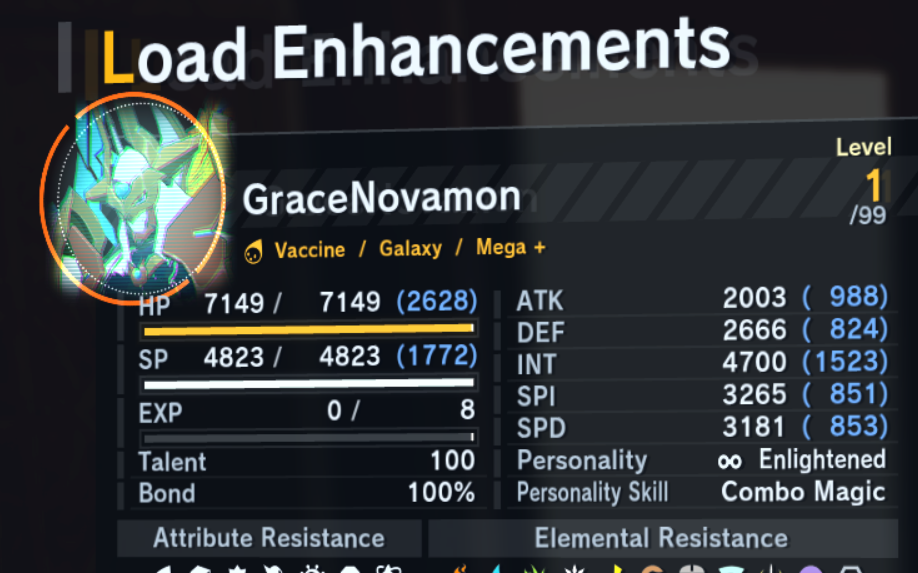
Transferal of blue stats through load enhancements
Step 1: The Components
We have two Digimon for this process:
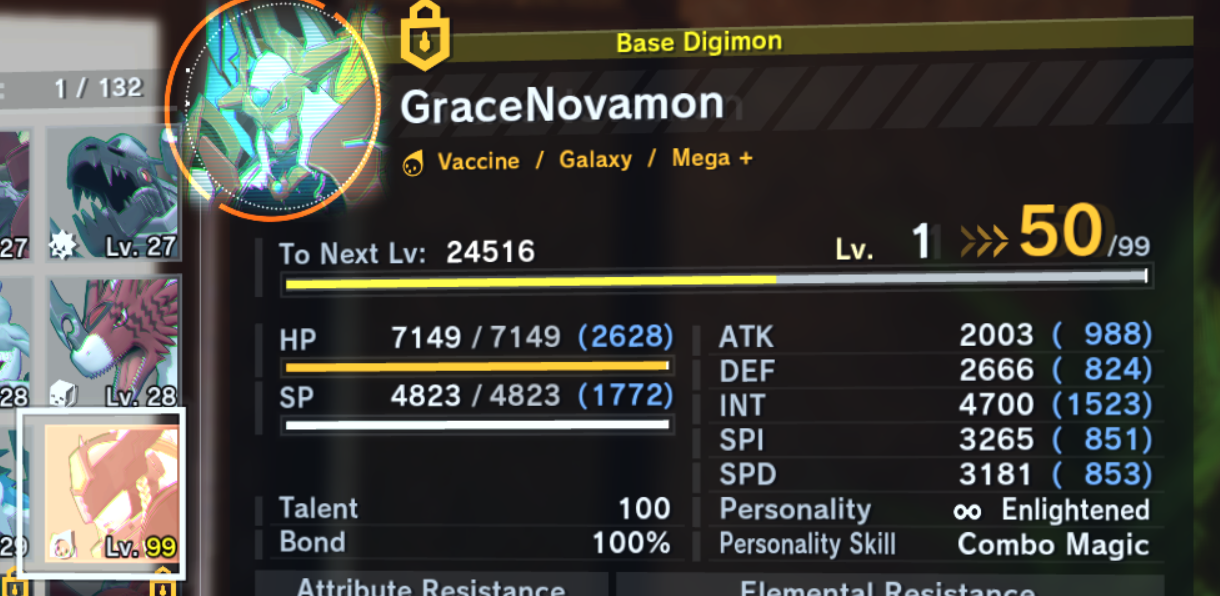
The Fodder (Source): GraceNovamon
As you can see, your GraceNovamon is at Level 1 but has massive bonus stats (e.g., +2628 HP, +824 DEF, +1523 INT). It also has 100 Talent and 100% Bond.
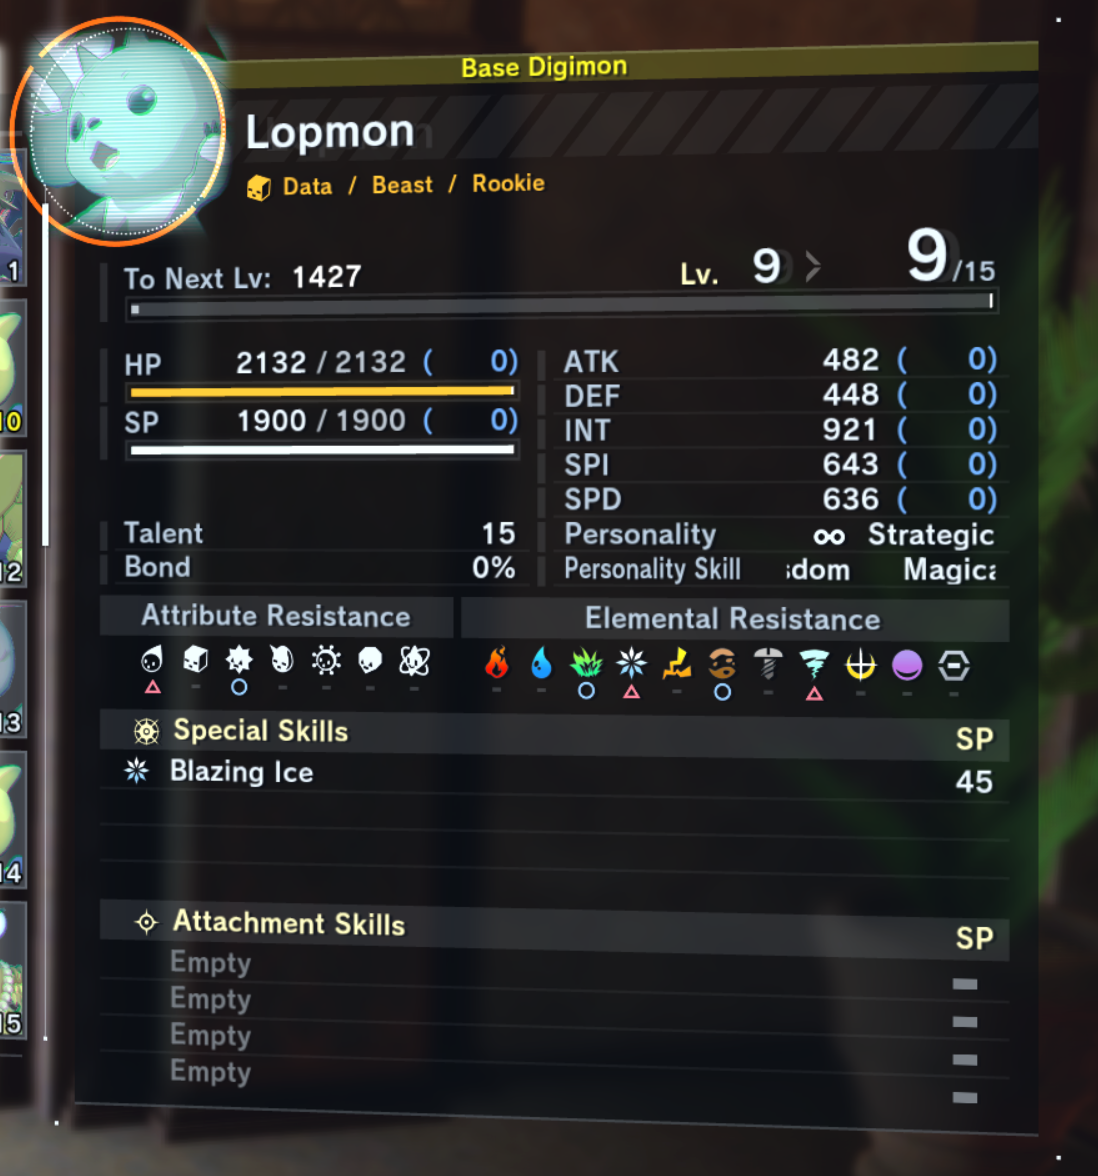
The Recipient (Target): Lopmon
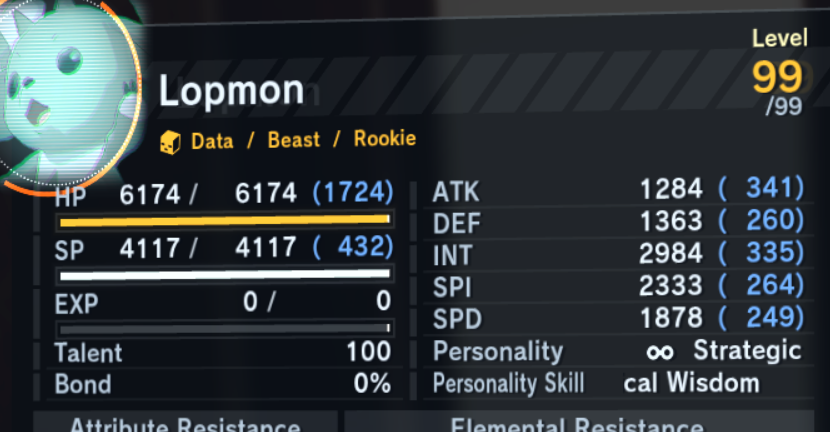
Lv 9 Lopmon is a "blank slate," with no bonus stats and low Talent.
Step 2: The "Before" State - The Recipient
As shown, the Lv 9 Lopmon is starting with zero bonus stats.
Level: 9
Talent: 15
Bonus Stats: (0) across the board.
Step 3: The Transfer Process
Initiate "Load Enhancements," selecting Lopmon as the recipient and the stacked GraceNovamon as the fodder. The process consumes GraceNovamon and transfers its enhancements to Lopmon.
The Rule: Lopmon will receive 50% of GraceNovamon's blue stats.
Formula:
Transferred Bonus Stat = 50% × (Fodder's Bonus Stat)
Let's verify this.
Defense (DEF) Transfer:
GraceNovamon's Bonus DEF: 824
DEF Transferred to Lopmon: 0.50×824=412
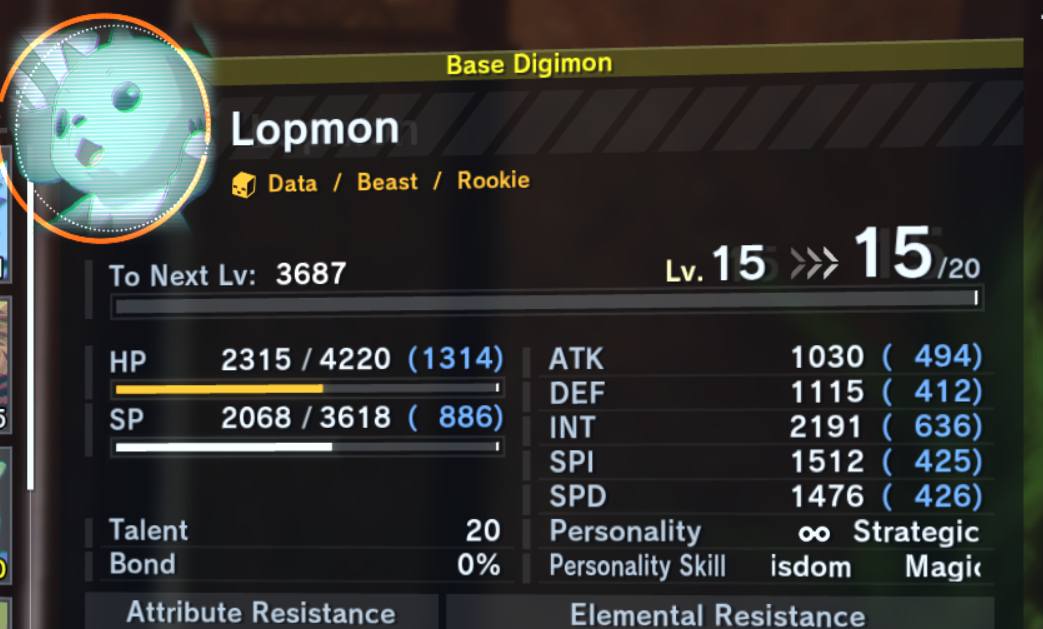
Result: Lv 15 Lopmon now has a +412 bonus to DEF. This matches the image perfectly.
Attack (ATK) Transfer:
GraceNovamon's Bonus ATK: 988
ATK Transferred to Lopmon: 0.50×988=494
Result: Lv 15 Lopmon now has a +494 bonus to ATK.
Intellect (INT) Transfer:
GraceNovamon's Bonus INT: 1523-250= (I forgot to unequip an attachment of +250 INT)
INT Transferred to Lopmon: 0.50×1273=636.5
Result: Lv 15 Lopmon now has a +636 bonus to INT.
Blue stats are rounded down when transferred at a 50% rate. Personality plays no affect on this process.
EXP difference between digivolution stages
1st set are digimons from in-training 1 to mega, all at lvl 1, 0 bond.
Conclusion, digivolution stage matters
2nd set are digimons from in-training 1 to mega, all at lvl 1, 90 bond.
Conclusion, bond matters more
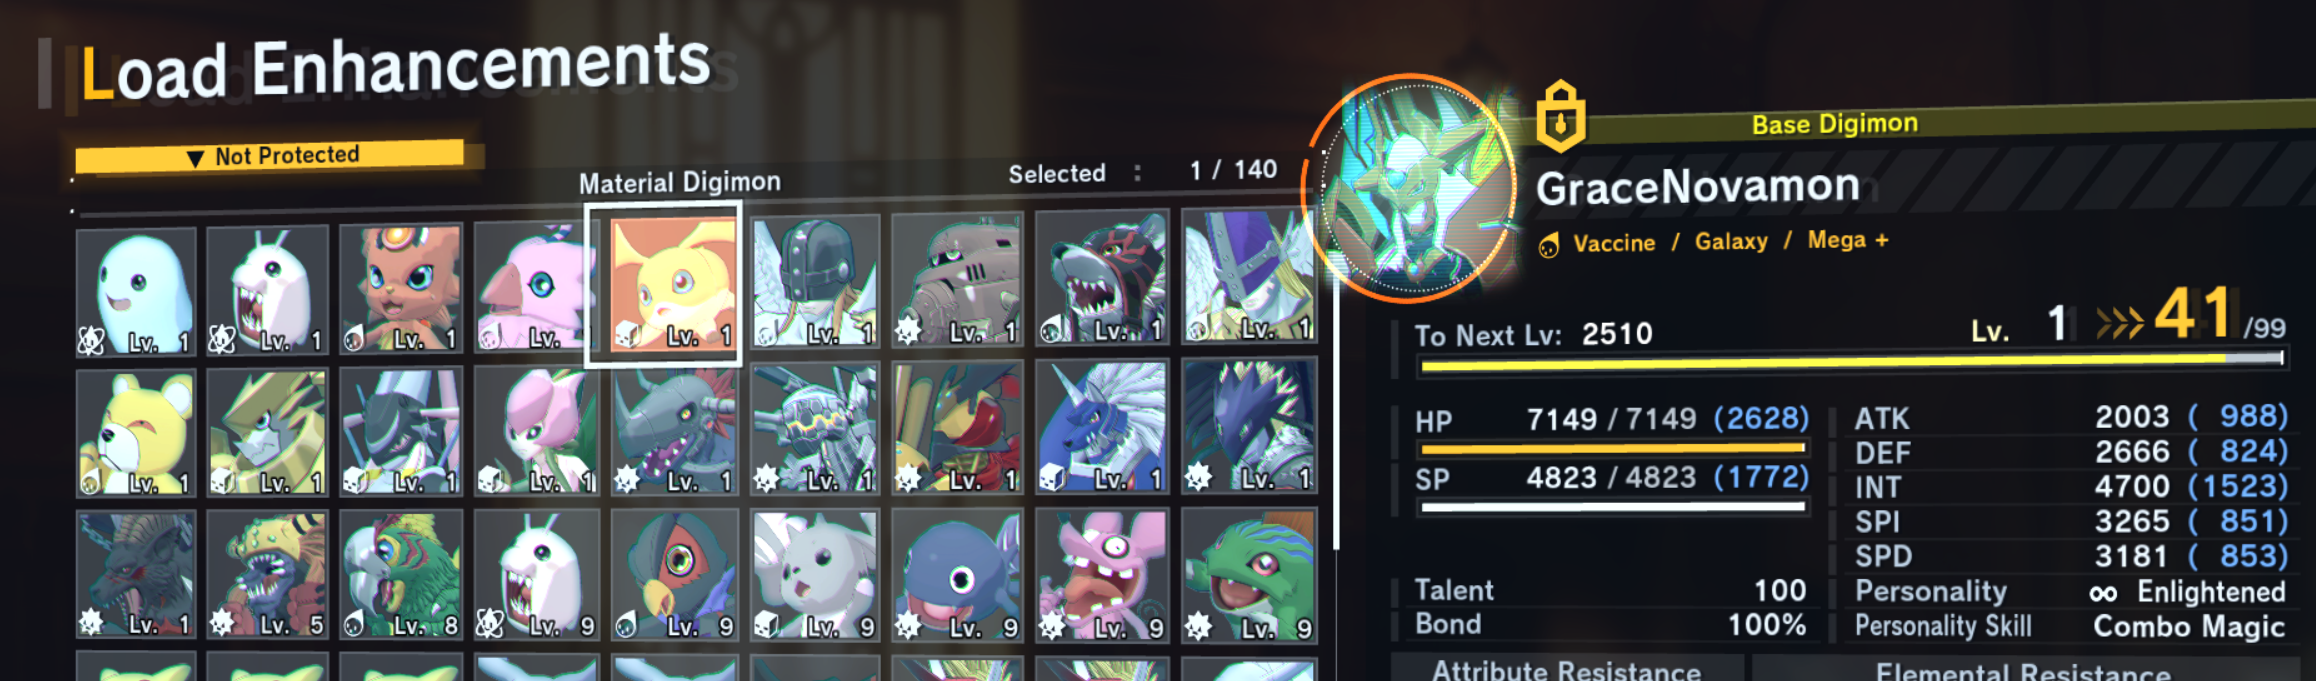
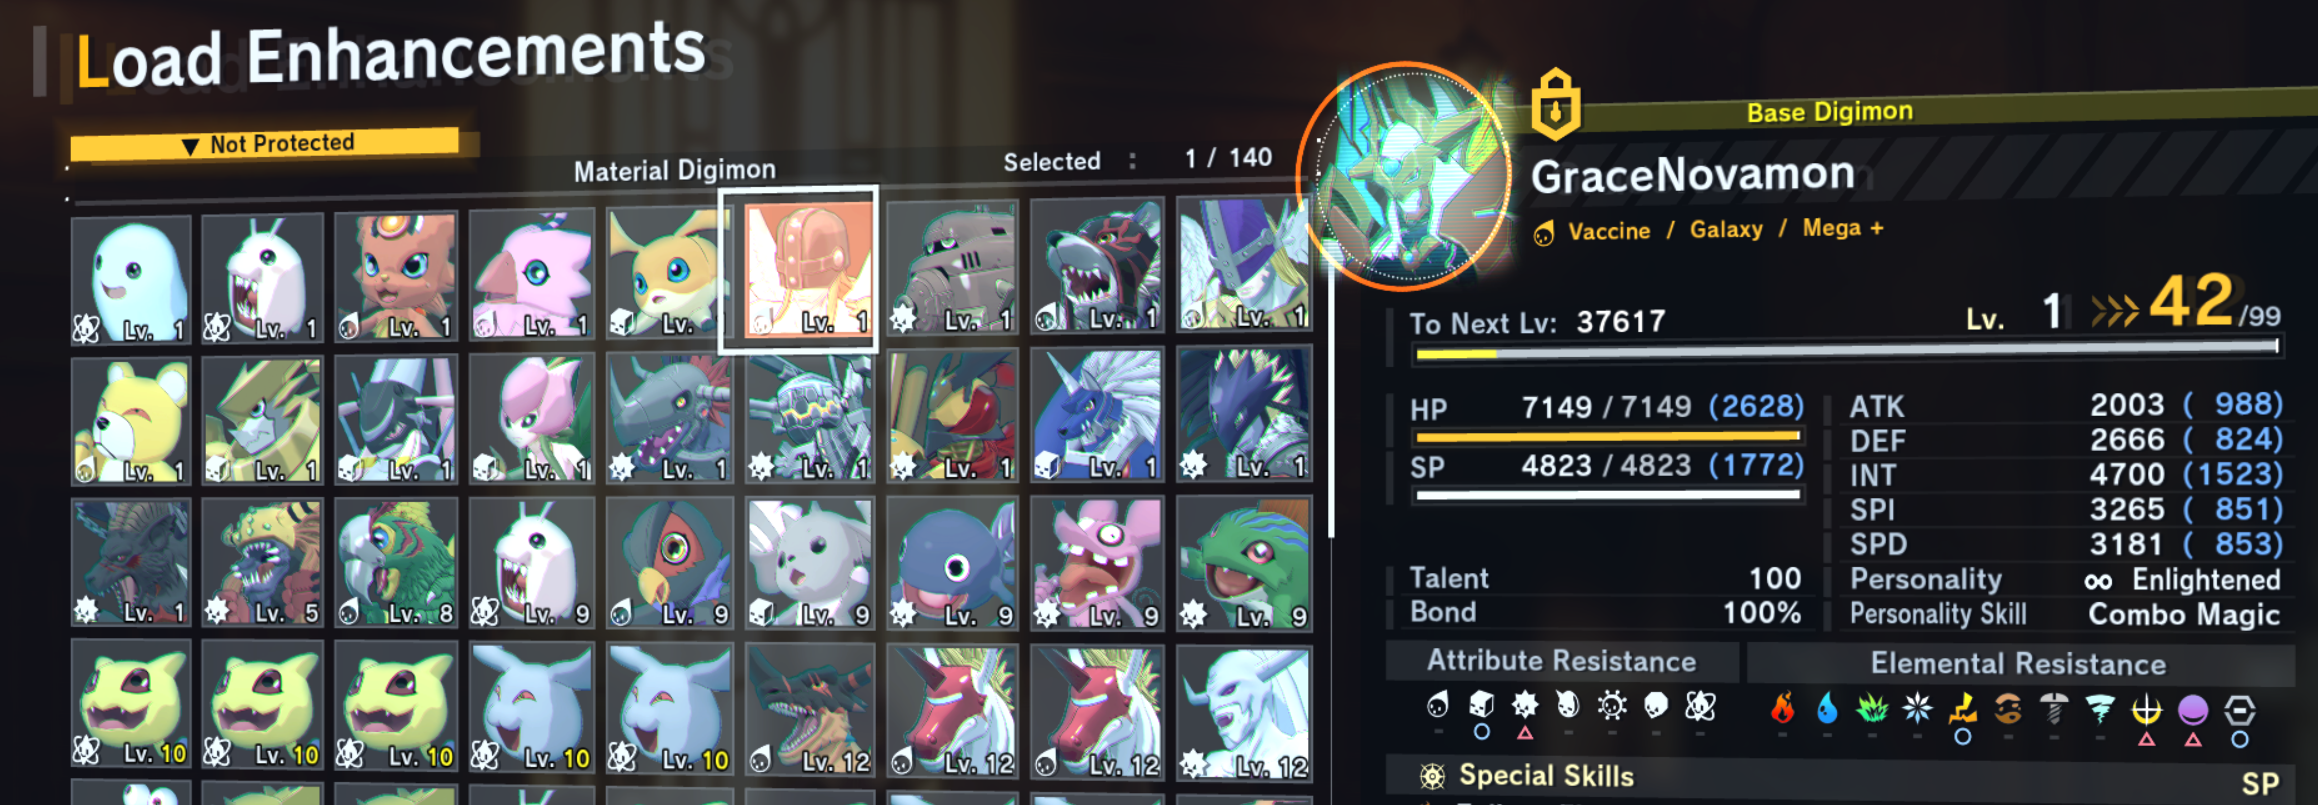
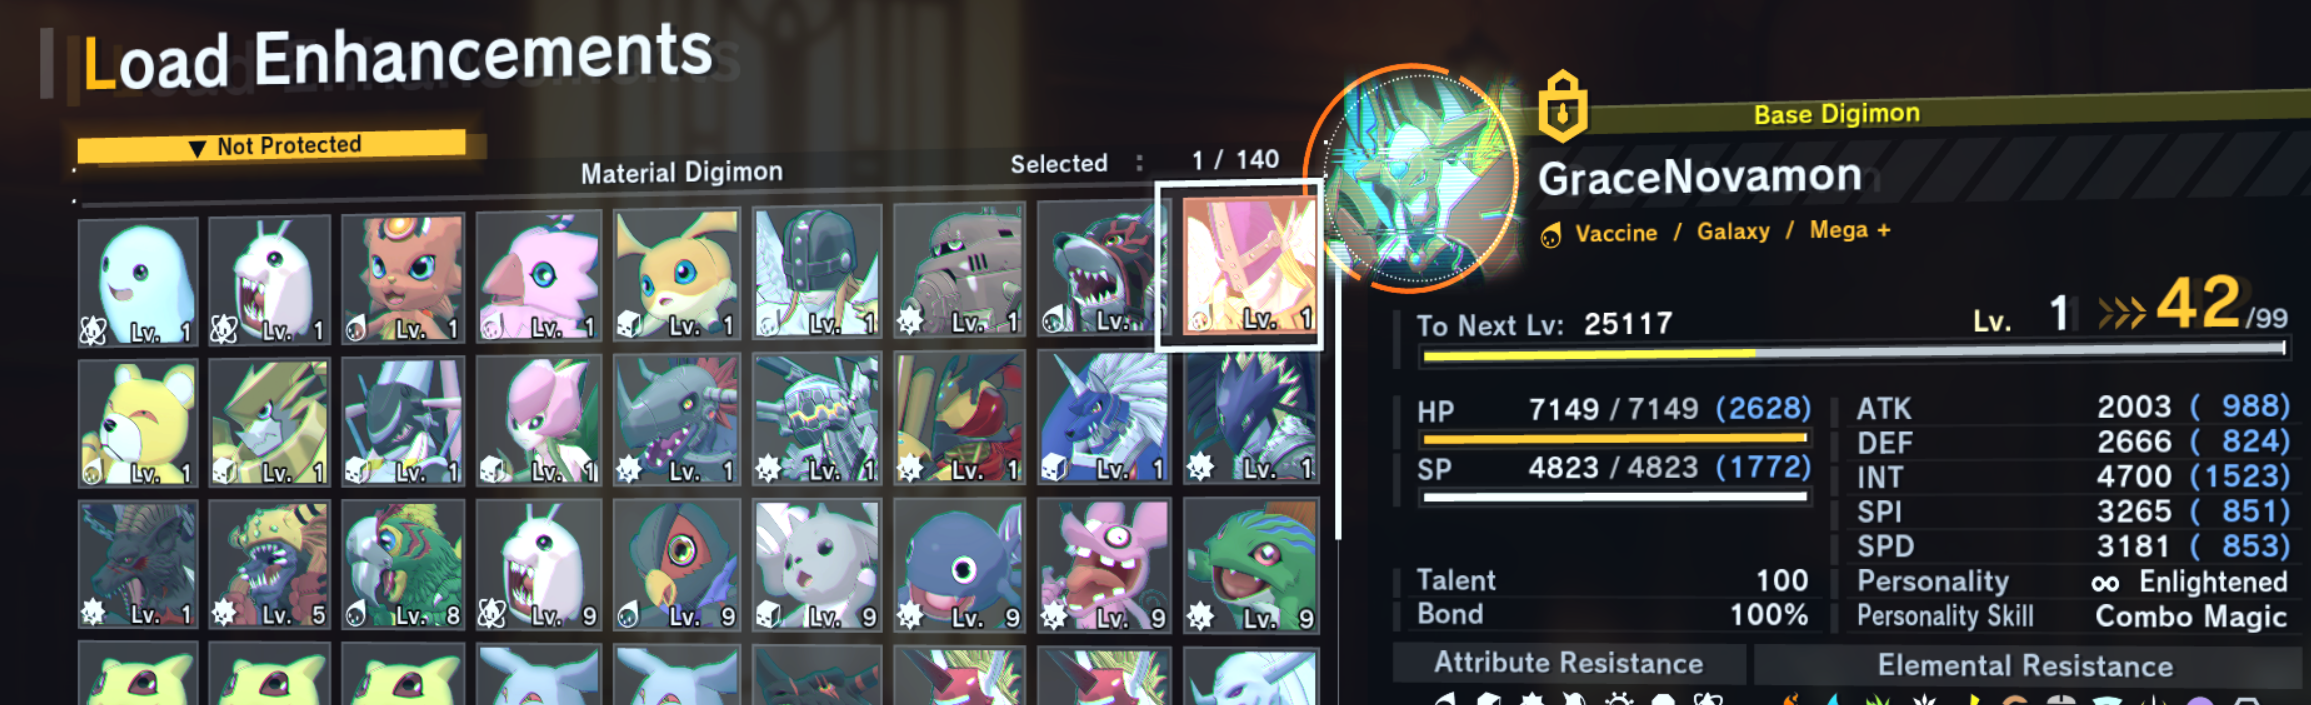
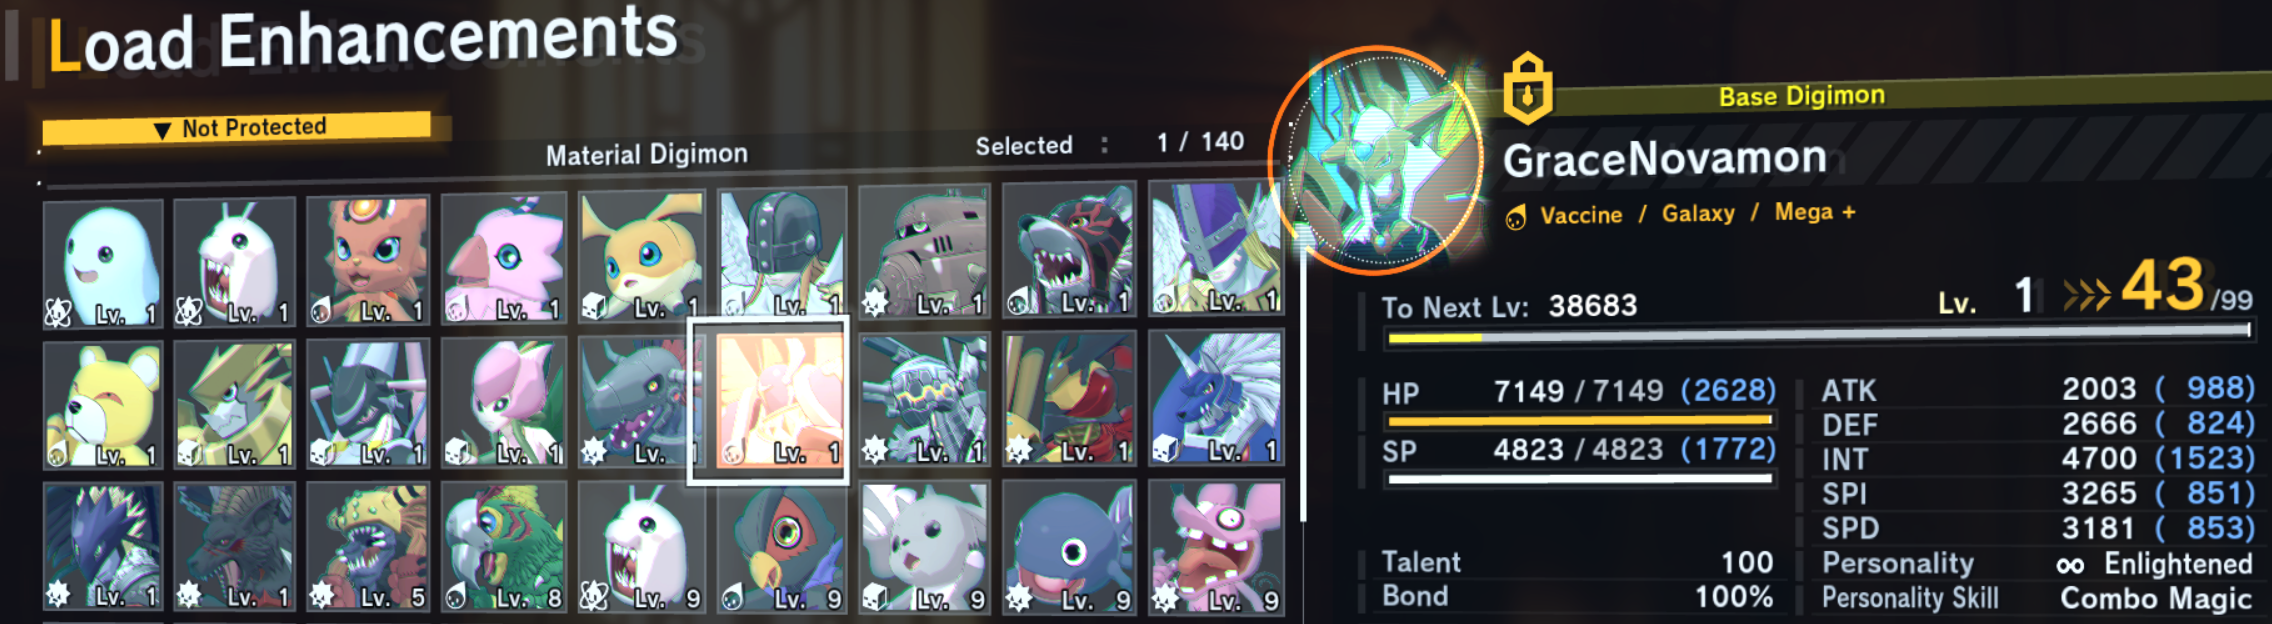
More on the effect of fodder bond on EXP gained
Fodder: Max lvl Lopmon (Rookie), 0 bond
Fodder: lvl 1 Patamon (Rookie), 100 bond
Fodder: max lvl Patamon (Rookie), 100 bond
Fodder: max lvl Mastermon (Mega), 100 bond
Fodder: max lvl MarineAngemon (Mega), 100 bond
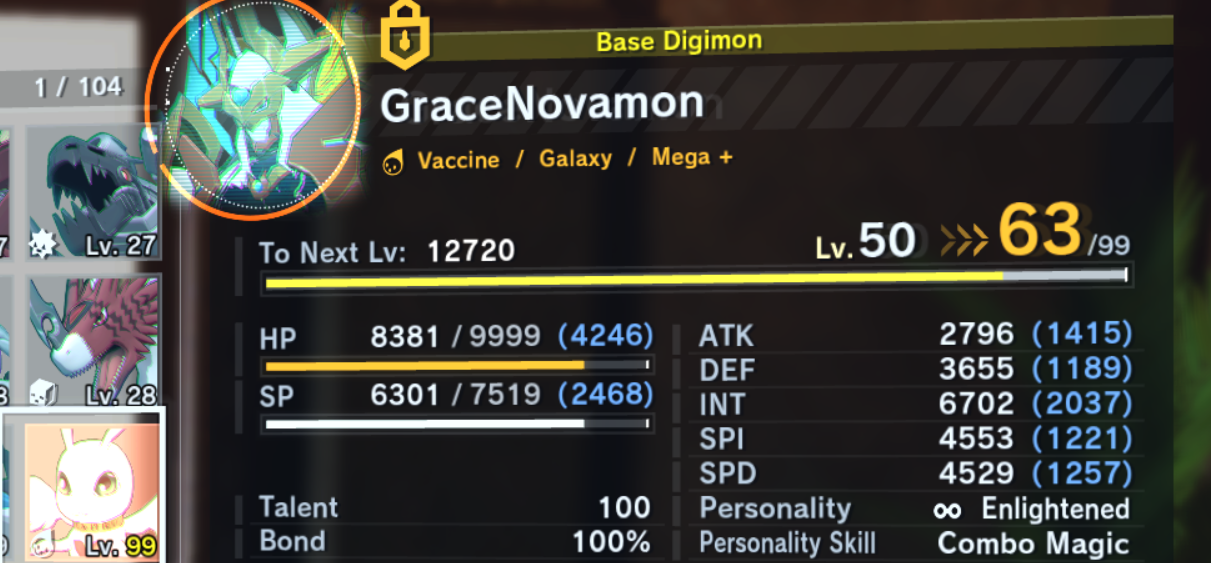
With the same amount of EXP gained, it only pushes you from lvl 50 to lvl 63, a meager 13 levels instead of 49 levels from level 1. The EXP gain curve is steep.
We can conclude that in load enhancements, bond, digivolution stage and level of the fodder plays a massive role in EXP gained.
Disclaimer
Its my first guide so information is not too complete. Do help me fill in the gaps by commenting below.
Finally feels complete now!
Special thanks to the heated discussions in the comment sections, and to my co-authors!
Script feels AI Written? It partially is. Thanks Gemini~