 Day One Fixes
SolvedHow-toUpdated
SILENT HILL F: All Puzzle Solutions
Short answer
Puzzles in Silent Hill f are major key objectives that vary in type and difficulty. See all puzzle solutions, codes, and all of their locations in the game here!
Steam Community guide by Saigofu.
Dark Shrine Path Puzzle Solutions - Altar Puzzle
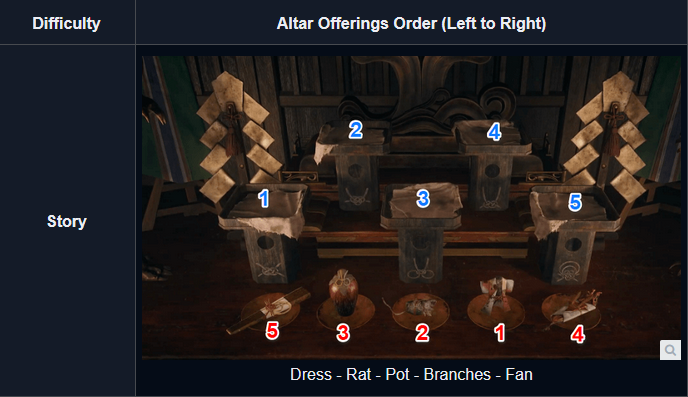
Place the altar offerings on the pedestals in the correct order. The solution changes by difficulty: Story and Hard provide visual clues, while the highest difficulty requires solving a riddle.


Dark Shrine Path Puzzle Solutions - Shrine Vault Puzzle
Find all 3 Emas to acquire the Combination Lock Dial needed for the lock. Refer to the Journal afterwards for the symbols to input on the Shrine Vault lock.

Ebisugaoka Fields (Fog Town) Puzzle Solutions - Doctor's House Puzzle
You can enter the Doctor's House using the ladder found at the side of it. Climb up and enter through the window to find collectibles and an Omamori Pine.


Ebisugaoka Fields (Fog Town) Puzzle Solutions - Field Puzzle
Remove flashcards embedded inside the correct scarecrows to escape the fields. The features of the correct scarecrow will vary based on your puzzle difficulty, though you'll be given clues to figure out which one it is. Do note that removing a flashcard from the wrong scarecrow will make it hostile.
Everytime you remove a nail/flashcard the scarecrow will point to somewhere, just follow where they are pointing to unveil a new row of scarecrows.

Ebisugaoka Middle School Puzzle Solutions - Stairwell Puzzle
Find the 2F Stairwell Key to progress. Its location changes depending on puzzle difficulty, with clues scattered throughout the school. If you already know the location, you can retrieve the key directly without gathering every clue.

Ebisugaoka Middle School Puzzle Solutions - Secret Box Puzzle
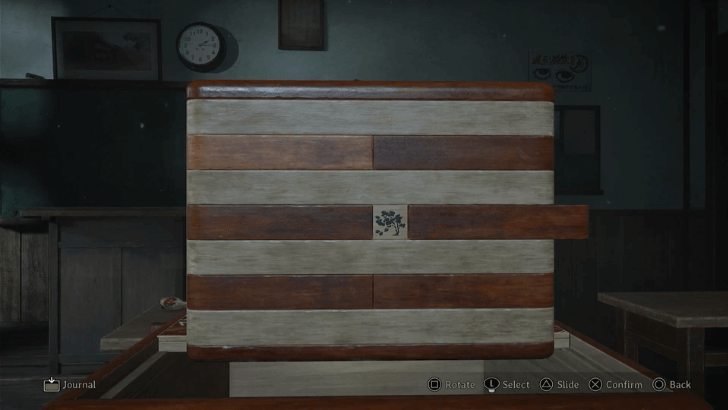
The Secret Box puzzle requires you to match symbols on the box based on the clues from Rinko's letters. The keywords for the 3 rounds are sweet and tart fruit, journal, and sakura in full bloom.
In Lost in the Fog.:
Stage #1: Reveal the cherry, strawberry, berries, and pineapple on one side of the puzzle, and the cut orange and apple on the other. (Don't overthink it. Yes, eggplants and tomatoes are fruits; no, they aren't sweet.)
Stage #2: Reveal all the books. There are 4 on one side of the puzzle and just one on the other.
Stage #3: There are a total of 4 cherry blossoms on the puzzle. As before, you're looking for blossoming branches, rather than anything that looks like a tree or potted plant. 3 are on one side, and 1 more is on the other.


Ebisugaoka Middle School Puzzle Solutions - Locker Code Puzzle
You must unlock Asakura Ayumi's locker to retrieve the key to the cabinet in the faculty room of Ebisugaoka Middle School. Only her locker code varies per difficulty, and can be deciphered using the Girl Code clue found within the school's Old Annex.
The other lockers are optional and will have the same code across all difficulties. Opening them will give you useful items such as a School Bag for extra inventory and an Omamori Wolf in your first playthrough, then replaced with Hokora offering items in consecutive runs.


Dark Shrine Worship Hall Puzzle Solutions - Door Puzzle
You must activate the Fox Statues to open doors in the Dark Shrine Worship Hall. Navigate around closed doors and make your way to the central area where Sakuko can be found at the end of the hall.

Dark Shrine Worship Hall Puzzle Solutions - Light Puzzle
Directional Legends: W = West, E = East
The Light Puzzle requires you to fix the direction the fox and rabbit statues are facing, as they control the height level of the hanging cages in the room. The hanging cages contain the lampshades required for you to retrieve the key from the altar.


Dark Shrine Worship Hall Puzzle Solutions - Cage Puzzle
Forward-Facing Fox Crest


Leftward-Facing Fox Crest


** Rightward-Facing Fox Crest**
The Cage Puzzle requires finding the the Forward-Facing Fox Crest, Leftward-Facing Fox Crest, and Rightward-Facing Fox Crest for the device in front of the cage. These fox crests can be acquired in the western chambers of the Dark Shrine Worship Hall.


Dark Shrine Worship Hall Puzzle Solutions - Memories Puzzle
Brainiac Hero Comic


Drawing of a Young Shimizu Hinako


Raygun
The Memories puzzle involves finding Shu's Prized Possessions within the Dark Shrine. The number of items to find increases with difficulty level, with 1 prized possession to locate in Story Mode, 2 for Hard Mode, and 3 total possessions for the highest difficulty.


Dark Shrine Main Hall Puzzle Solutions - Crimson Water Puzzle (New Game+)
The Crimson Water puzzle is a New Game Plus puzzle found in the unlocked area, Hermitage of the Crimson Water. You must ring three bells in the correct order to complete the puzzle. When you ring a bell, wait for the bamboo fountain to make a sound before interacting with the next one.


Shimizu Residence Puzzle Solutions - Scales Puzzle
The left and right sides can be switched. The dolls are not tied to a specific side.
The arrangement of the dolls on the scales mainly differ based on which ending is being progressed. The dolls can be interpreted as Hinako's inner turmoil with her priorities and responsibilities as a daughter, friend, and person.

Shimizu Residence Puzzle Solutions - Ominous Photo Puzzle
The orientation of the photos vary based on the ending being progressed. To solve the puzzle, check the photo with everyone and turn all those blurred out upside down. Do note that you must look for Hinako's portrait in Shimizu Residence II before you can finish this puzzle.
Coming Home to Roost.: If this is your first playthrough of the game, you will get this ending regardless of what you do. You are only able to do other endings if you finish the game at least once. So, for this puzzle, if this is your first playthrough, just do the Coming Home to Roost solution.

Shimizu Residence Puzzle Solutions - My Room Puzzle
The My Room puzzle requires you to place and arrange Crests on the door to unlock Hinako's room. The order of these Crests change depending on the ending you're on.
Coming Home to Roost.: If this is your first playthrough of the game, you will get this ending regardless of what you do. You are only able to do other endings if you finish the game at least once. So, for this puzzle, if this is your first playthrough, just do the Coming Home to Roost solution.


Dark Shrine Rooms Puzzle Solutions - Mural Puzzle
The Mural Puzzle requires players to place three Crests inside the holes of the wall to fit according to the provided poem. The poems and Crest positions vary based on the ending.
Coming Home to Roost.: If this is your first playthrough of the game, you will get this ending regardless of what you do. You are only able to do other endings if you finish the game at least once. So, for this puzzle, if this is your first playthrough, just do the Coming Home to Roost solution.


What are Puzzles in Silent Hill f? - Required for Story Progression
Puzzles are a core part of Silent Hill f’s gameplay, serving as key obstacles that must be solved to progress through the story. They appear throughout your journey, acting as a challenging checkpoint or a potential roadblock depending on your chosen difficulty.