 Day One Fixes
SolvedHow-toUpdated
PAYDAY 3: The Lengthy Guide
Short answer
(Updated for 1.4.0) Technical breakdown of weapons, attachments, enemies, skills, and more. Has timers, triggers, and walkthroughs for every heist. Not quite the long guide, but close enough.
Steam Community guide by KarmicChaos.
Overview
This guide is very long, so use of Ctrl + F is recommended.
Thanks a lot to everyone for using this guide. This took countless hours of work to put together and requires even more work to keep it up to date. I hope you can spare 3 seconds to give it a rating if you found it useful, because it really helps!
~KarmicChaos
Frequently Used Terms
In order for this guide to not alienate new players, the following list will break down all the terminology and abbreviations used frequently in this guide or by the community.
- Root Skill: The leftmost skill on a skill line (the one that can be aced by spending 2 skill points).
- Mastery Skill: The rightmost skill on a skill line (the one that can be bought without buying the basic root skill).
- Recovery Armor: After taking damage, your armor bar will have a red flashing portion of armor which we refer to as "recovery armor." This is the chunk of armor that can be recovered via skills or by not taking damage for a few seconds.
- Assault Intensity / Assault Tier: Refers to a particular game mechanic that makes assaults more difficult as you progress throughout a heist. See the section Loud - Assault Intensity & Tiers
- Meta: Short for "meta-game." The meta is a strategy, loadout, or playstyle that is considered by the larger community to be the most optimal and efficient way to achieve victory in a game, but is not always necessarily the most fun. For example, something "being meta for loud" would mean that it is part of "the meta" for loud gameplay.
- Proc: Short for "process" or "procedure." When some item, effect, or event "procs" or "is proccing," that means it has occurred/activated or is occurring/activating respectively.
- Anti-Synergy: Two things have a synergy if they interact to produce a combined effect that is better than the sum of their separate effects. An anti-synergy is the opposite of this concept, where two things interact to produce a combined effect that is worse than either of their separate effects alone. In other words, you would be better off using one or the other, because using both makes their effects cancel out.
- Stacking: When effects "stack," it means they can both be applied or active at the same time. This is usually used to clarify whether or not the same effect can be applied to the same target multiple times.
- "~": Short for "about / approximately." Numbers with this symbol might not be exact, and could be slightly off.
- NPC: Short for "Non-Player Character." This refers to cops, guards, civilians, and employees. This does NOT refer to the bots that take the role of other heisters if you are playing alone.
- RNG: Short for "Random Number Generation." RNG is used by video games to make things unpredictable, such as what enemies will do, or where items will spawn. Gamers will frequently use "RNG" to refer to this process in a way that is similar to the word "Luck," such as referring to something beneficial as "having good RNG."
- HUD: Short for "Heads Up Display." This is the name for the overlay in a video game that tells the player things like health, ammo, and armor.
- UI: Short for "User Interface." Similar to the HUD, but also includes menus and other things the player interacts with outside of regular gameplay.
- NRFTW: Short for the heist "No Rest For The Wicked."
- Civ: Short for "Civilian."
- Cam: Short for "Camera."
- kc: Short for "Keycard."
- ADS: Short for "Aim Down Sights / Aiming Down Sights."
- AoE: Short for "Area of Effect."
- FoV: Short for "Field of View."
- LoS: Short for "Line of Sight."
- HP: Short for "Health Points."
- DMG: Short for "Damage."
- AP: Short for "Armor Penetration."
- RPM: Short for "Rounds per Minute."
- AR: Short for "Assault Rifle."
- SMG: Short for "Submachine Gun."
- 2p: Short for "2 player(s)."
- P1 / P2: Short for "Player 1" / "Player 2."
Changelog & To-Do
This guide will be regularly updated with new information for the foreseeable future. Below are a list of major changes that have been made as well as a to-do list of planned changes for the future. Small changes are not listed in the changelog. Please only leave a comment suggesting topics to cover in the guide if you've checked to see if it's in the guide, as we probably already covered (or are planning to cover) the topic.
Changelog:
- 10/19/23 - Guide published
- 10/20/23 - Add base reload times, thermal lance, breaching equipment pics.
- 10/21/23 - Add AP formulas, armor hardness, custody times/penalties/respawn supplies.
- 10/24/23 - Add weapon mods with numerical stats, stat descriptions.
- 10/25/23 - Add corpse carry mechanics, weapon recoil patterns, section on recoil/gunkick/spread.
- 10/26/23 - Add NRFTW (stealth) walkthrough.
- 10/27/23 - Add Dirty Ice (stealth), Rock the Cradle (stealth) walkthroughs, weapon mod pics.
- 10/28/23 - Add "Hack & Smack" exploit.
- 11/2/23 - Add Under The Surphaze (stealth) walkthrough, new 1.0.1 enemy behaviors; Remove patched exploits.
- 11/3/23 - Add Gold & Sharke (stealth) walkthrough, Strategist synergies, sections on favors, weapon EXP.
- 11/5/23 - Add Dirty Ice (loud), Touch The Sky (loud) walkthroughs.
- 11/6/23 - Add new 1.0.1 favors.
- 11/7/23 - Add Under The Surphaze (loud) walkthrough, Blast Shield synergy.
- 11/12/23 - Add 99 Boxes (stealth), Touch The Sky (stealth), NRFTW (loud) walkthroughs.
- 11/13/23 - Add Rock The Cradle (loud) walkthrough.
- 11/14/23 - Reorganized exploits into their own new sections. Add "Infinite Marking" exploit, Gold & Sharke (loud), 99 Boxes (loud) walkthroughs.
- 11/30/23 - Add new 1.0.2 skills/heists/balance changes. Remove patched exploits.
- 12/2/23 - Add armor lining recovery speeds, table of heist IP rewards, Turbid Station walkthrough.
- 12/3/23 - Updated walkthroughs except for Touch The Sky. Add Cook Off walkthrough.
- 12/6/23 - Updated Touch The Sky walkthroughs. Add Camera Drone section.
- 12/8/23 - Add sections on "How to Cook Meth" & armor chunks.
- 12/12/23 - Add new 1.1.0 skills/weapons/heist/balance changes/enemies, section on Consumables, missing pics for enemies.
- 12/13/23 - Add Syntax Error walkthroughs.
- 12/15/23 - Add ammo pickup for mag mods, new DLC weapon mods.
- 12/20/23 - Add enemy respawn timers.
- 3/28/24 - Add new 1.1.2 skills/armor and skill/weapon changes. Updated Security Modifiers.
- 3/29/24 - Remove patched exploits.
- 3/30/24 - Add section on Adrenaline. Updated enemy spawn mechanics.
- 5/31/24 - Add sections on Shock Grenade, Tactical Drone, new 1.1.4 security modifiers/skills. Updated Techie and Drones. Re-added missing pics.
- 6/1/24 - Add drone HP/armor values, Tactical Drone pic, sentry hacking. Updated Heists IP section for 1.1.4.
- 6/2/24 - Add C-Stack cost-efficiency table, stealth exploit. Updated walkthroughs.
- 8/25/24 - Add sections on Cops, Donuts, Trip Laser. Updated armor, consumable carrying, and health/adrenaline mechanics. Remove some patched exploits.
- 8/26/24 - Add missing weapons. Update all skills & weapons for 1.3.0.
- 8/27/24 - Add triggers & IP rewards for Houston Breakout.
- 8/28/24 - Add stealth walkthroughs for Houston Breakout, Diamond District.
- 8/29/24 - Add magazine table, missing weapon pics.
- 8/31/24 - Add basic heist info & stealth walkthroughs for Diamond District, Houston Breakout, Boys in Blue.
- 9/1/24 - Add loud walkthrough for Diamond District.
- 9/3/24 - Add loot bag list to each heist.
- 9/9/24 - Add missing recoil patterns, fix major error (recoil & gunkick were swapped).
- 9/14/24 - Add common & uncommon enemy damage stats. Reorganize the guide.
- 9/15/24 - Add most special enemy damage stats. Fix broken images.
- 9/16/24 - Update for 1.4.0 balance changes & fixes mentioned in blog.
- 9/20/24 - Add new weapons, more weapon stats.
- 9/21/24 - Add M135, section on critical health.
- 9/22/24 - Add basic heist info & stealth walkthrough for Fear & Greed.
- 10/1/24 - Add missing assault mechanics across multiple sections.
To-Do: - Test & add section on stun/stagger mechanics.
- Test & add section on movement speed.
- Create walkthroughs for Boys in Blue, Houston Breakout, & Fear and Greed.
- Rewrite NRFTW stealth walkthrough.
- Rewrite weapon attachment sections.
- Investigate which heists reward which heist-specifc favors (it may not be as random as previously thought).
- Section on bot behavior (low priority)
- Test & update unconfirmed bits of guide, missing numbers, percentages
- Per-heist diagram of guard patrols, item/loot spawn locations, etc. (can't be done until we have a map or freecam)
Enemies - Civilians & Employees
In stealth, the main threats to blowing your cover are cameras, guards, and civilians. Each of these are described in more detail below.
Civilians / Employees
1 HP // 0 Armor
~20m detection range
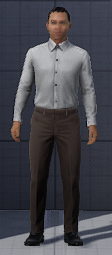
Civs are split into two types: civilians (pictured on the left) and employees (pictured on the right). The only way to visually distinguish between them is how formal their clothes are, with civilians typically wearing casual clothes and employees typically wearing formal clothes or construction vests. When this guide refers to "civs", it generally means both civilians and employees (unless employees are explicitly mentioned, in which case we are referring to them separately).
Employees will call security if they see something amiss, which takes them a full 10s, after which they will return to what they were doing. Civs are harmless to the player, but will panic at the sight of a masked heister. If a scared civ can make it outside of the map, they will call the cops, which instantly sounds the alarm.
Civs can be taken as hostages, traded for supplies, and used as human shields to deter cops from shooting at you. When holding a hostage as a human shield, you move slower, can only use your secondary weapon, and take longer to reload, but cops will only shoot at you if they are sure they won't hit the civ, leading to you taking a lot less damage from the front. Common enemies who are close enough will run up to you and attempt to stun you with a melee attack, making you drop the civ you were holding as shield.
Killing a civilian (or other enemy that is taken as a hostage) incurs a cleaning cost to the person who killed them. This is a decent amount of money that is deducted from your payout at the end of the heist, and can pile up fast if you kill a lot of hostages. Killing a hostage will also increase the amount of time you spend in custody. You can pick up and relocate a civilian's dead body to hide it in a better spot, but while carrying a body you cannot crouch or sprint.

Enemies - Guards & Cops
Guard
100 HP // 0 Armor
~20m detection range
WeaponDMGAccuracyRPMMax DPSPistol4 / 4 / 6 / 100.3 / 0.4 / 0.5 / 0.648032 / 32 / 48 / 80
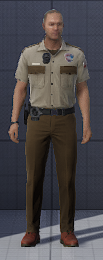
There are a certain number of guards in each heist, each with their own unique patrol pattern. Higher difficulties may add more guards and change up certain patrol patterns to be less forgiving. Guards will regularly walk between certain spots on their patrol route, stopping for several dozen seconds at each spot. They will sometimes stand still, wander in circles, go on their phone, or smoke a cigarette while they wait at these spots, but each behavior is tied to each specific spot; If a guard smokes when he reaches a certain spot in his patrol, he will always stop to smoke there. Learning these waiting animations can give you a heads up to know when a guard is about to move on to the next spot in his patrol.
If a guard is unaware of you, you can sneak up behind him and grab him as a human shield, just like you can with a civ. Doing this will allow you to choke him for a silent kill, known as a "takedown." If you kill or takedown a guard, hold one as a shield for long enough, or force a guard to surrender, their radio will go off after 10s. If a heister then interacts with the guard's body, they will take several seconds to answer the pager. You can answer a guard's pager while you are carrying his body.
You are only allowed to answer a limited number of radios in a heist. If you use up all your radios, the next radio you answer will instantly sound the alarm. If you instead let the next radio go unanswered, the heist will enter search mode, or if the heist was already in search mode the alarm will sound.
Failing to answer a radio, or starting to answer a radio but releasing F before you finish, will reduce the amount of radios you can answer by 2. It will also cause the closest guard to come investigate the spot where the pager was when you failed to answer it. If you move the body before the next guard arrives, he will simply look around before returning to his regular patrol.
If a guard spots something, it will only take him 3s to radio in to sound the alarm or initiate search mode.
After the alarm sounds, guards will continue to fire at the heisters until the assault indicator says "First Responders Incoming", at which point all guards will surrender, obeying all the same rules as a civilian hostage for the rest of the heist (including the penalties for killing them).
Lead Guard
Has identical stats to regular guards.
The lead guard is an extra troublesome guard that only spawns on a heist with the "Lead Guard" security modifier. Only one lead guard will spawn. The lead guard is identical to a regular guard in almost every way, having only two differences: An infinite radio & an extremely unforgiving patrol path.
If the lead guard is killed, his radio will go off after a short delay like a normal guard, but once it is answered or ignored, a new timer will start for 70s, after which his radio will go off again. This process repeats infinitely, draining your radio uses the longer the lead guard is dead. For this reason, it is generally recommended to leave the lead guard alive if attempting to stealth.
In addition, the lead guard has a carefully crafted patrol path that is designed to screw over the player much more than a regular guard. He patrols across important areas across the heist, and will regularly enter rooms and paths that heisters are likely to hide in. Many of his patrol spots exist in rooms that no other guard ever visits, turning rooms that are usually safe into unsafe hiding spots. His patrol route will frequently update to include new patrol spots when certain objectives are completed or new areas are unlocked.
A common way to deal with the lead guard is to stick a micro cam or a motion detector on his butt. The micro cam can be used to mark him at any time, and the motion detector will keep him marked permanently. This will let you know where he is at all times, helping you to avoid getting caught by his unusual patrol path.
Cops & First Responders
100 HP /// 0 Armor
~20m detection range
WeaponDMGAccuracyRPMMax DPSSMG4 / 4 / 6 / 100.6 / 0.7 / 0.8 / 0.978026 / 26 / 39 / 65
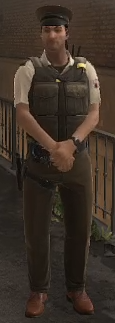
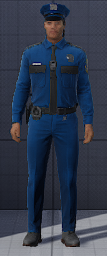
Cops (not to be confused with first responders) are currently exclusive to the Boys in Blue heist. Cops act almost identically to guards in stealth, but have identical combat stats to that of a first responder. The main difference in stealth is that cops will not put the heist into search mode if they find something suspicious - They will immediately call to sound the alarm if they cuff a player or see a sabotaged object/bag. A red scope icon with a skull will appear above them when they are calling for the alarm, notifying heisters to eliminate them before their call goes through.
Unlike guards, cops will not surrender once the heist goes loud, instead continuing to pursue the players. Just like with first responders, damaging or approaching a cop will still skip negotiations, but since cops will continue to pursue you during this time, negotiations will usually be accidentally skipped unless you manage to kill all cops before negotiations begin.
First Responders (not to be confused with the "Cop" enemies) are the police that pull up in police cars when you initially go loud. The negotiation period starts when they arrive, but will be skipped if anyone in your crew takes certain actions (See "Negotiations" in the section Loud - Hostage Mechanics). The first responders will advance to attack with the first assault wave, but are very weak, and no more will spawn once they are killed.
Enemies - Common SWAT
Common SWAT enemies are simply the cannon fodder that you will find yourself up against for most of the heist. There is a limit to how many common enemies can be on the map at once (unconfirmed amount, but it seems to scale with difficulty?).
SWAT
150 HP // 70 Armor
Armor Hardness: 1.5
WeaponDMGAccuracyRPMMax DPSAR5 / 5 / 6 / 120.2 / 0.3 / 0.4 / 0.680066.67 / 66.67 / 80 / 160SMG2 / 2 / 4 / 80.4 / 0.5 / 0.6 / 0.895031.67 / 31.67 / 63.33 / 126.67Shotgun15 / 20 / 25 / 500.6 / 0.6 / 0.7 / 0.910025 / 33.33 / 41.67 / 83.33Pistol4 / 4 / 6 / 100.3 / 0.4 / 0.5 / 0.648032 / 32 / 48 / 80
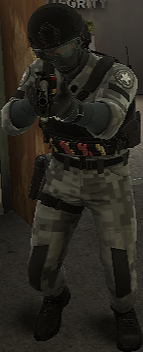
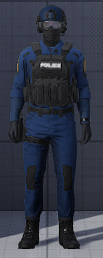
SWAT units are the armored cops that you will be fighting most of the time. They have set locations on each heist where they can spawn, but will always choose to spawn from spots that are nearby to the players. Some SWAT units wield an SMG (pictured on the left), others wield an AR, and others wield a shotgun. SWAT with different weapons can be differentiated by what is on their chestpiece and the badge on their shoulder; A white badge & red shotgun shells mean they have a shotgun, a white badge & smaller chestpiece with large magazines means they have an AR, and a yellow badge & larger black chestpiece with small magazines means they wield an SMG. Shotgun SWAT will switch to a much weaker pistol if there is a hostage nearby to their target.
Heavy SWAT
150 HP // 170 Armor
Armor Hardness: 1.5
WeaponDMGAccuracyRPMMax DPSAR5 / 5 / 6 / 120.35 / 0.45 / 0.55 / 0.7580066.67 / 66.67 / 80 / 160SMG2 / 2 / 4 / 80.55 / 0.65 / 0.75 / 0.9595031.67 / 31.67 / 63.33 / 126.67Shotgun15 / 20 / 25 / 500.7 / 0.7 / 0.8 / 1.010025 / 33.33 / 41.67 / 83.33Pistol4 / 4 / 6 / 100.3 / 0.4 / 0.5 / 0.648032 / 32 / 48 / 80
Heavy SWAT units will spawn instead of regular SWAT units once the heist reaches assault tier 3 (See the section Loud - Assault Intensity & Tiers). They deal the same damage and have the same health as a regular SWAT, but have increased armor and are notably more accurate. Despite having more armor, they still have the same armor hardness as a regular SWAT. Heavy SWAT can spawn with an SMG (pictured on the left), an AR, or a shotgun, just like regular SWAT. Note that Sabotage Specialists and Hostage Rescue Units are also replaced by their Heavy SWAT counterparts once the assault reaches tier 3.
Hostage Rescue Unit
Has identical stats to regular/heavy SWAT.
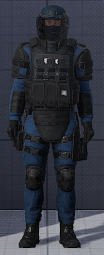
Hostage Rescue Units (HRUs) periodically spawn in groups of up to 3, and only 3 hostage rescue units can be on the map at once. They spawn as long as there are hostages on the map that are tied down, and Shade will announce when they spawn in, giving you time to react. Just like regular SWAT, they can spawn with an AR, SMG, or shotgun, and have Heavy SWAT variants for tier 3.
Instead of pursuing the heisters, they will seek out cowering or tied up hostages on the map and set them free. When